¶ Import
Data can be imported into Insignia and exported from it through the Import, and Import Metadata, features. Patron data can be imported from another system or added manually. Item records can be imported from a MARC file.
¶ Item Import
The Item tab allows users to import MARC records into the ILS.
- Navigate to Administration > Import/Export > Import.
- Select Import From File and select the MARC file from your computer. Alternatively, drag and drop the file into the drop files here to upload area.
- Select the settings and options to apply to the imported records upon import:
| Setting | Description |
|---|---|
| Mapping Format | The format is selected after Mapping has been set up through the Mapping button. |
| Prompt Before Update Item | If selected, the ILS will prompt before updating any item records in the system with the imported file. |
| Rename Tag | If only 1-2 tags need to be renamed during the import, enter the tags into the fields. |
| Encoding | Select the encoding format to use when importing the file (Default, Arabic, or Unicode). |
| If the Item Being Imported Already Exists Then | 1. Skip the Item will skip over the item record and prevent it from being created or updated if the item already exists. 2. Update the Item will update items with the imported information. 3. Create New Item will add an additional item if the record is a duplicate. |
| Include Copy Information In Tag 852 | Select to import copy information in tag 852. |
| Add [X] Copies If No 852 Tag | Select to import a specified number of copies when the 852 tag is provided in the MARC record. |
| Add Prefix | Use this checkbox to add a prefix onto the barcode, usually to create a centralized 14-digit barcode. |
| Skip The Copy | Select the radio button to skip over duplicate copy records and prevent them from being imported. |
| Update The Copy | Select the radio button to update duplicate copies with imported information. |
| Mapping | Use the dropdown to select a Copy Mapping Format if Copy Mapping has been completed. |
| Holding Format | Use the dropdown menu to concatenate the subfields k, h, i, m. |
| Multicopies | Select this option to import multiple 852 tags. |
| Show Error Messages | Select to see error messages during import to view additional details on why some record could not be imported. |
| Textbook MARC Data | Select this checkbox to import the data as a textbook. |
| eBook School Based | If eBooks are imported, select this checkbox to only make the eBooks available for your local library. |
| New Item | Select to designate the imported item records as New Items, which will appear in a display on the Discovery Layer. |
| Only Replace These Tags When Update Item | Enter tags into the field that only update the tags when the item record is updated through the import process. |
| Data Unique By | Use the dropdown to select how the system will determine if the data is unique. If it is system defined, the system will first look at ISBNs, then title and author. |
| Source | Use the dropdown, if necessary, to select a Source for the import (i.e. EBSCO, Learn360, Overdrive, etc.). |
| Collection Type | If a Collection Type is selected in this dropdown, the imported records will be listed under this collection type. |
| Microlif -> MARC | Select to convert Microlif files to MARC format. |
| Put The Imported Items Into Subset | Select to put the imported items into a Subset. Enter the name of the Subset into the field to the right. This is useful if you would like to revisit the imported records in the future. |
| Copy Call No Prefix | Enter a call number prefix into the field to add it to all copies imported. |
| Call No Mapping | Add mapping for call numbers if Call No Mapping was previously set up. |
| Vendor | Use the dropdown to select a vendor. All records imported will be listed from this vendor. |
| Budget | If a budget is selected, it will be applied to all imported items. |
| P.O. Number | If a P.O. Number is selected, it will be applied to all imported items. |
| Allow Inter-Library Loan | Select to designate the imported item records to be allowed for inter library loan. |
| Save Criteria | Select Save Criteria if you would like to save the settings and options you have applied for future item imports. |
| Delete Criteria | Select Delete Criteria if you would like to remove previously saved settings and options that were applied for item imports. |
| Open Source | Select the Open Source checkbox to make imported eBooks accessible to users across all sites. |
| Import all tags | Select Import all tags checkbox to import all the tags from the import file into the system. |
| Clone LOC Authority | Select the Clone LoC Authority checkbox to search the Library of Congress (LoC) Authority database and clone matching authorities into the imported records. |
| Save Copy Call No To Item Call No | Enable this option to save the copy's call number to the item call number for the imported records. |
| Copy Status | Select the status for the copies being imported from the Copy Status window. By default, the status for the imported copies will be set to "IN." |
- Select Test to test the import file.
- A prompt will show the number of records read from the file. If no errors are found, choose Yes to import the file or No to cancel.
- Results will appear at the lower of the window.
NOTE: Once the import begins, the Import button changes into a Cancel button, which can be used to cancel the import process.

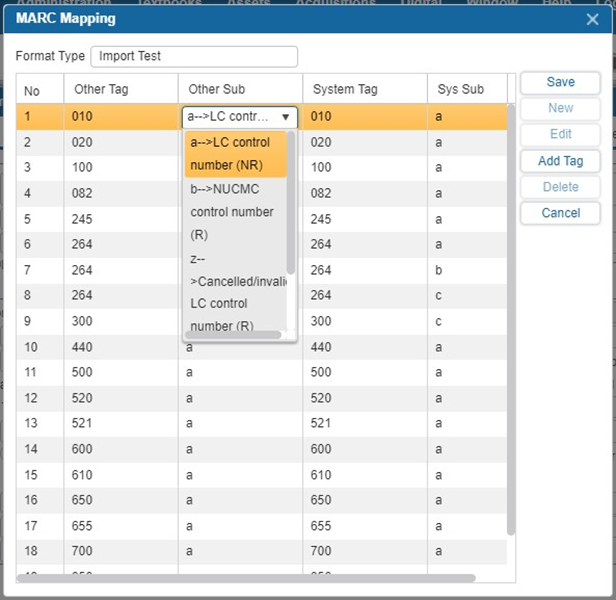
¶ Mapping Format
A Mapping Format should be set up prior to the import.
- Navigate to Administration > Import/Export > Import > Item tab.
- Select the Mapping button.
- Select New.
- Click on the Other Tag field you wish to edit and select the ellipsis button.
- In the pop-up, search for a tag and select Add.
- Use the Other Sub dropdown to select a subfield.
- Repeat step 3-5 to fill in the System Tag and Sys Sub fields.
- The Other Tag and Other Sub will be replaced with System Tag and Sys Sub when the records are imported.
- Continue adding all of the MARC fields to be changed. When finished, select Save.
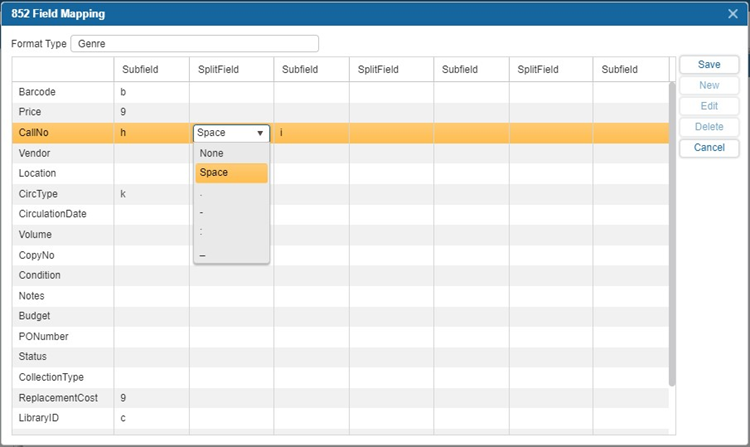
¶ Copy Mapping
Copy mapping will take all of the values in the 852 field of the imported record and change them to specific values when imported into the ILS.
- Navigate to Administration > Import/Export > Import > Item.
- Select Copy Mapping.
- Select New to create a new Format Type.
- Click on the Subfield or Splitfield and use the dropdowns to set what the system will gather from the copy information.
- Select Save.
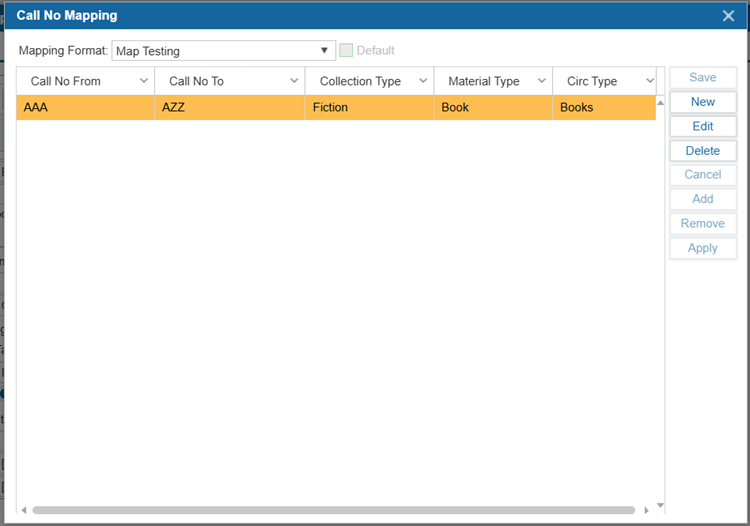
¶ Call No Mapping
Call No Mapping adds predefined fields to new records cataloged in Basic Info based on the call number entered. This feature will only set fields in new item records manually created from Basic Info and will not affect records added through Z39.50.
- Navigate to Administration > Import/Export > Import > Item.
- Select Call No Mapping.
- Select New and enter a name for the mapping format.
- Select Add and select in the grid under each column to enter information into the fields. Repeat to add more mapping settings.
- Select Save.
- Select Edit to change any previous call no. mapping.
- Select Delete to remove any previous call no. mapping formats by selecting them from the dropdown list.
- To remove individual rows from this window, select the row and select Remove.
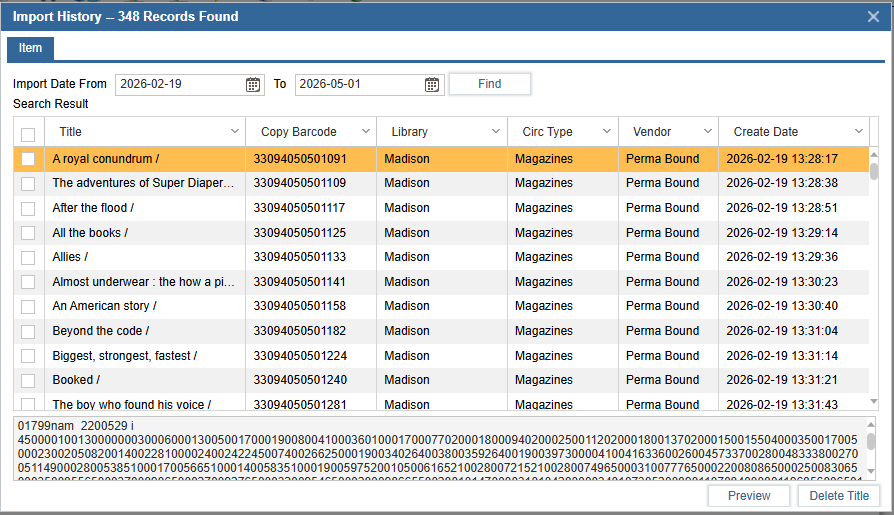
¶ History
The History option allows the user to view previously imported items by using date range as the search criteria.
- Navigate to Administration > Import/Export > Import.
- Select History.
- Select an Import Date range.
- Select Find.
- To view copy information such as Barcode, Library, and the Circ Type, select the item and select the Copy Information tab.
- To remove items from this list, select the checkbox beside the item and select Delete. This will not remove the item from your catalog. It will only remove the item from the import history list.
¶ Offline Circ
If you have Offline Circulation set up, the Offline Circ tab allows you to upload circulation transactions, new Patrons created, and catalog information
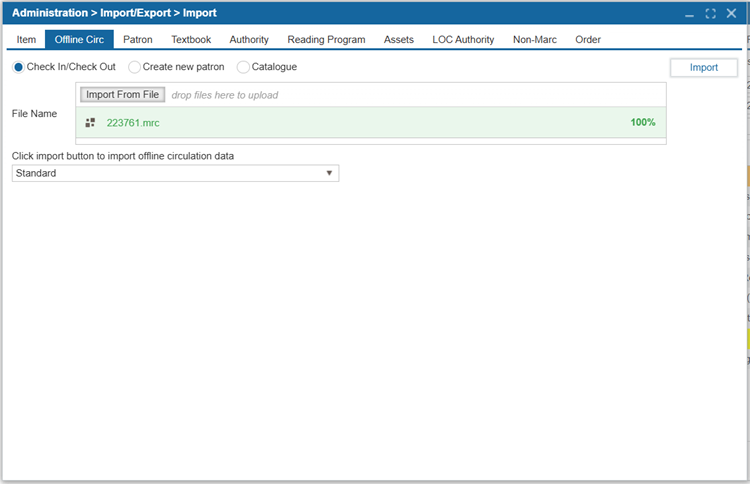
- Navigate to Administration > Import/Export > Import > Offline Circ tab.
- Select the type of information in the offline circulation file you would like to import by using the radio buttons for Check In/Check Out, Create New Patron, and Catalog.
- Use the dropdown to select the format for the import (Standard or Metrologic).
- Select Import From File to browse for the file on your computer. Alternatively, drag and drop the file into the drop files here to upload area.
- Select Import to import the data.
¶ Patron Import
Patrons can be imported using the appropriate file format. Staff can import data from another system provided it is in ASCII format. A template that shows how the data was exported from the other system may be required. It is also possible to import pictures for Patrons from this tab.
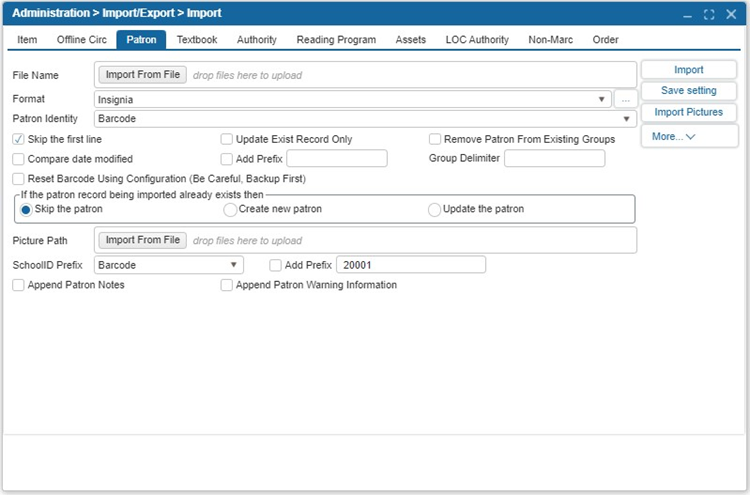
- Navigate to Administration > Import/Export > Import > Patron tab.
- Select Import From File and browse your computer for the Patron import file. Alternatively, drag and drop it into the drop files here to upload area.
2.1. Make sure that the file is in a tab or comma delimited format. - Select the file format to use from the Format dropdown. To customize the Format, select the ellipsis button. This opens the Import File Format Specification window.
3.1. Select New to add a new format or Edit to edit an existing one.
3.2. Enter or edit the Format name.
3.3. Set the Total Field Amount which reflects the number of fields in the file.
3.4. Select the format the Patron import file is in: Fixed Field, Tab Delimited, or Delimited Format (specified with punctuation in the field to the right).
3.5. In the grid, select into the Field beside the order # and order the fields according to the file being imported by using the dropdown menus for each.
3.6. Select Save and exit window.

- Use the dropdown to select a Patron Identity, which will be used to identify the Patrons and match them to the correct record in the ILS. The chosen Patron identity field must be included in the import file.
- Slect the settings and options to apply to the imported records upon import.
- Select Import.
- The Total Read, Total Imported, and Total Updated will be indicated at the lower of the import screen once the Patron import has been completed.
- If the Patron file is not recognized, a prompt will appear. This indicates that the imported file is not in the format selected.
¶ Import Options:
| Option | Description |
|---|---|
| Skip the First Line | Skips the header row in an import file, if one exists. |
| Update Exist Record Only | Select to only update existing records and not import new Patrons. |
| Compare date modified | Compare a file’s Date Modified column with the date modified in the database. If the database has the latest date, the import will skip the column. |
| Add Prefix | Select to add a prefix to the Patron barcode imported into the system. Enter the prefix into the field to the right. |
| Reset Barcode Using Configuration (Be Careful, Backup First) | Select to reset the barcode using the barcode feature in Configuration. Please create a backup file of the import before checking this box. |
| If The Patron Being Imported Already Exists Then: | - Skip The Patron will skip duplicate Patrons if they already exist. - Create New Patron will create new separate Patron profiles for duplicate Patrons. - Update The Patron will update existing Patrons and also import new Patrons. |
Note: School ID is no longer required when importing Patrons. If you are logged in to a school site, Patrons will be automatically assigned that school name during import. If you are logged in as admin, Patrons will be assigned to a school based on library ID.
¶ Import Patron Pictures
This feature will take Patron photos from a zip file on the computer drive and import them into Insignia Patron profiles.
- Navigate to Administration > Import/Export > Import.
- Select the Patron tab.
- Next to Picture Path, select Import From File and select the .zip file with the Patron photos in it. The Patron photos should be in the root of the .zip file, not under any subfolders. Alternatively, drag and drop the .zip file into the drop files here to upload area.
- Select the radio button to Update The Patron.
- Select Import Pictures.
NOTE: The file names for the photos must match the value of the setting Default Picture Name under Patron in Administration > Library Setting > Configuration. The value options are Patron Barcode, Patron ID, or Student ID. If the value does not match, the pictures will not import successfully.
¶ Textbook Import
The Textbook Import tab allows users to upload Textbook records.
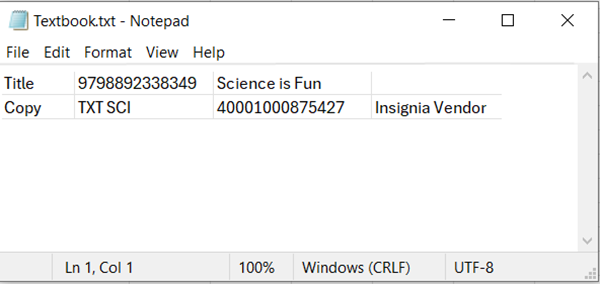
- Navigate to Administration > Import/Export > Import > Textbook tab.
- Select Import From File and browse your computer for the textbook import file. Alternatively, drag and drop it into the drop files here to upload area.
2.1. Make sure that the file is in a tab or comma delimited format.
¶ File Format
- From the Format dropdown, select the format you want to use. To customize it, select the ellipses (…) button to open the Import File Format Specification window.
- Click New to create a new format, or Edit to modify an existing one.
2.1. Enter or update the Format Name.
2.2. Specify the Total Field Amount, which reflects the number of fields in the import file.
2.3. Choose the file type: TAB Delimited or Delimited Format (and specify the delimiter symbol, e.g., comma).
2.4. Use the Textbook Unique By dropdown to select the field that will identify each textbook record (e.g., ISBN).
2.5. In the Item Format section, define the Line Identifier and set the Total Field Amount based on the item line in your file.
2.6. Map each field in the order it appears in the file using the dropdowns beside each field number.
2.7. Repeat the process for the Copy Format section.
2.8. Click Save to apply the format.

- Select the settings and options to apply to the import.
¶ Import Options
| Option | Description |
|---|---|
| Skip the First Line | Skips the header row in an import file, if one exists. |
| If The Textbook Being Imported Already Exists Then: | Skip The Textbook will skip duplicate textbooks if they already exist. Update The Textbook will update existing textbooks and import new ones. Create New Textbook will create new separate textbook records for duplicate textbooks. |
| If The Copy Being Imported Already Exists Then: | Skip The Copy will skip duplicate copies if they already exist. Update The Copy will update existing copies and also import new ones. |
- Click Import to begin the process.

¶ Authority Import
The Authority Import imports and links standardized authority records (e.g., from the Library of Congress) to bibliographic records, ensuring consistency in terms like names and subjects.
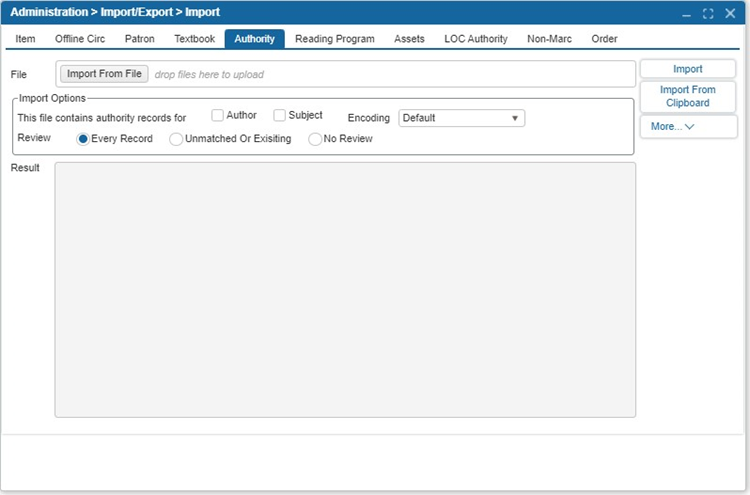
- Navigate to Administration > Import/Export > Import > Authority tab.
- Select Import From File and browse your computer for the authority record import file. Alternatively, drag and drop it into the drop files here to upload area.
- Select the following import options:
3.1. This file contains authority records for: Select whether the file contains authority records for Author, Subject, or both.
3.2. Review:
3.3. Every Record: Review all records before importing them into the system.
3.4. Unmatched or Existing: Only review records that do not match the authority files in the system.
3.5. No Review: Do not review any of the authority files that will be imported. - The Encoding dropdown allows you to select the character encoding for imported records, with options such as Default, UTF-8, and MARC-8.
- Select Import.
¶ Import from Clipboard
- Navigate to Administration > Import/Export > Import > Authority tab.
- Using Internet Explorer, navigate to the website that allows the user to download MARC records.
- On the website, select the option that lets user save the MARC record.
- Open the MARC record.
- Select the MARC code by pressing Ctrl + A to select the text; then press Ctrl + C to copy it to the Clipboard.
- In the ILS, select Import From Clipboard.
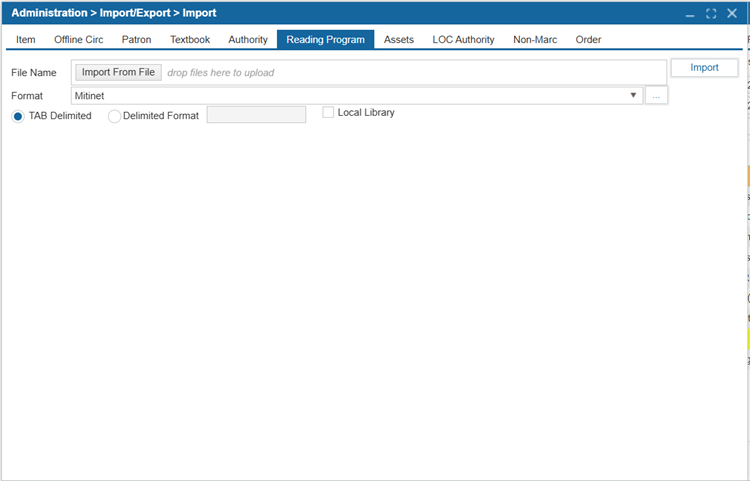
¶ Reading Program Import
Reading program information can now be imported for a variety of reading programs.
- Navigate to Administration > Import/Export > Import > Reading Program tab.
- Select Import From File and browse your computer for the reading program import file. Alternatively, drag and drop it into the drop files here to upload area.
- Choose the type of the reading program import file: TAB Delimited or Delimited Format (specified with punctuation in the field to the right).
- Select the format to use from the Format dropdown. To customize the Format, select the ellipses button. This opens the Import File Format Specification window.
4.1. Select New to add a new format or Edit to edit an existing one.
4.2. Enter or edit a format name.
4.3. Use the Unique By dropdown to which will be the unique identifier.
4.4. In the grid, select into the Field Position in the right column beside the field(s) you would like to edit the order for according to the file being imported.
4.5. Select Save. - Select Import.
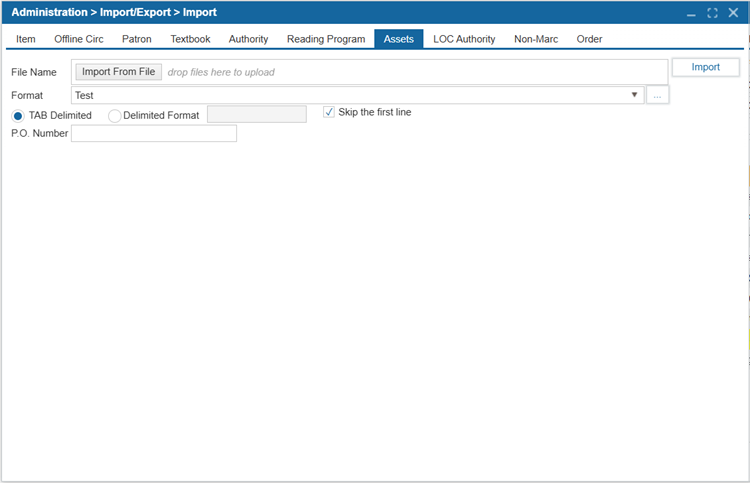
¶ Assets Import
The Assets Import tab allows users to upload Asset records.
- Select Administration > Import/Export > Import > Assets tab.
- Select Import From File and browse your computer for the asset import file. Alternatively, drag and drop it into the drop files here to upload area.
- Select the format the asset import file is in: TAB Delimited or Delimited Format (specified with punctuation in the field to the right).
- Select the file format to use from the Format dropdown. To customize the Format, select …. This opens the Import File Format Specification window.
4.1. Select New to add a new format or Edit to edit an existing one.
4.2. Enter or edit a format name.
4.3. Use the Unique By dropdown to which will be used to identify the specific textbook to match or create new records for.
4.4. In the grid, select into the Field Position in the right column beside the field(s) you would like to edit the order for according to the file being imported.
4.5. Select Save. - Select Skip the first line if the first line in the file should be skipped if it contains column headers.
- Entering the P.O. Number allows the user to add the purchase order number for the imported assets, which will be included in the asset’s title record under the Asset > Additional Copy Info tab.
- Select Import.
TIP: When creating your import format, ensure that Title is in Column A and that the Circ Type column is mandatory.
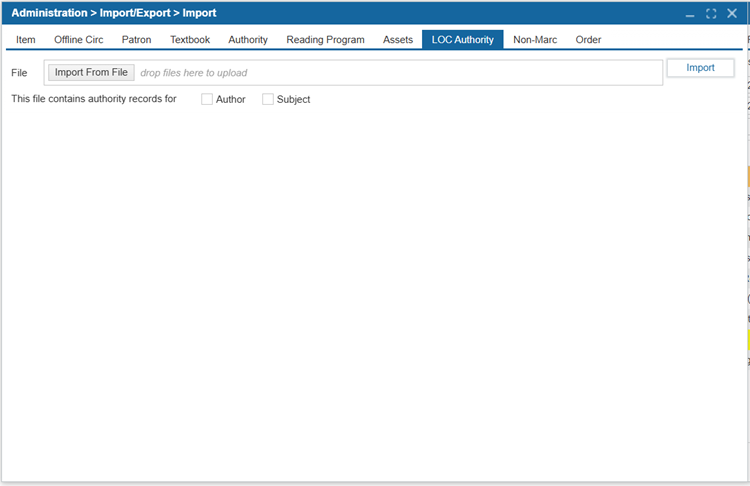
¶ LOC Authority Import
LOC Authority Import allows you to import authority records from the Library of Congress (LoC) into the system.
- Select Administration > Import/Export > Import > LOC Authority tab.
- Select Import From File and browse your computer for the LOC authority import file. Alternatively, drag and drop it into the drop files here to upload area.
- Select whether the file contains authority records for Author, Subject, or both by using the corresponding checkboxes.
- Select Import.
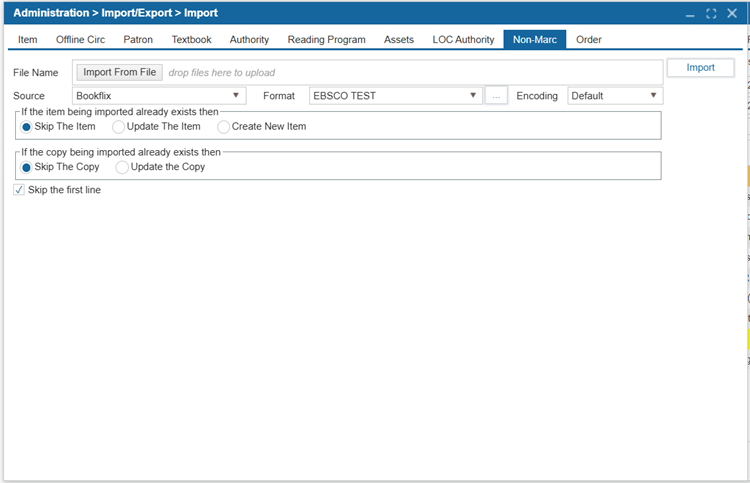
¶ Non-MARC Import
Non-MARC Import allows you to import bibliographic and item records that are not in the MARC format into the library management system.
- Select Administration > Import/Export > Import > Non-MARC tab.
- Select Import From File and browse your computer for the non-marc import file. Alternatively, drag and drop it into the drop files here to upload area.
- Use the Source dropdown to select a source for the file, such as EbscoHost, ProQuest, etc.
Note: Sources can be added, edited, and deleted from Administration > System Setting > Parameters.
4 Select the format to use from the Format dropdown. To customize the Format, select the ellipses button. This opens the MARC Format window.
4.1 Select New to add a new format or Edit to edit an existing one.
4.2. nter or edit a format name.
4.3. Enter the number of Columns that are in the file.
4.4. Select the format the Non-MARC import file is in: TAB Delimited or Delimited Format (specified with punctuation in the field to the right).
4.5. In the grid, select into the first column to rename the columns to match the ones in your file.
4.6. Select into the grid to enter the corresponding tags and subfields.
4.7. Select the Unique checkbox to mark the column unique.
4.8. Select Save.
If The Item Being Imported Already Exists Then:
5.1. Skip The Item will skip duplicate items if they already exist.
5.2. Update The Item will update existing items and also import new ones.
5.3. Create New Item will create new separate items records for duplicate items.
The Encoding dropdown allows you to select the character encoding for imported records, with options such as Default, UTF-8, and MARC-8.
If The Copy Being Imported Already Exists Then:
7.1. Skip The Copy will skip duplicate copies if they already exist.
7.2. Update The Copy will update existing copies and also import new ones.
Select Skip the first line if the first line in the file should be skipped if it contains column headers.
Select Import.
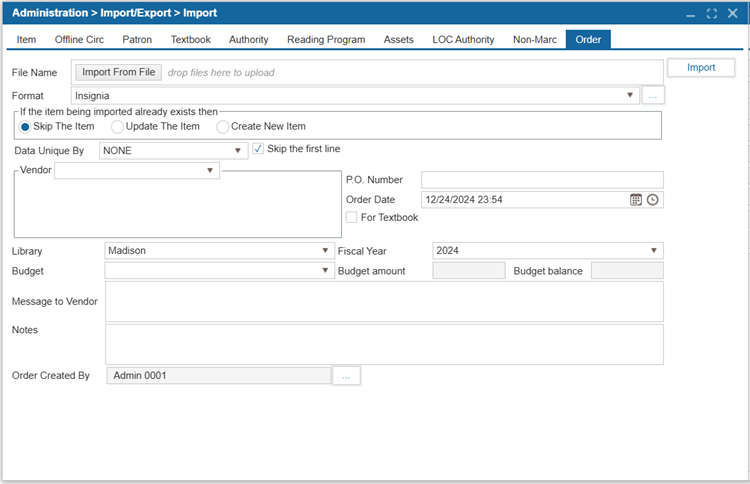
¶ Order Import
The Order Import feature allows you to import order records from external sources into the system.
- Select Administration > Import/Export > Import > Order tab.
- Select Import From File and browse your computer for the order import file. Alternatively, drag and drop it into the drop files here to upload area.
- Select the format to use from the Format dropdown. To customize the Format, select …. This opens the Import File Format Specifications window.
3.1. Select New to add a new format or Edit to edit an existing one.
3.2. Enter or edit a format name.
3.3. Enter the number of columns that are in the file in the Total Field number field.
3.4. Select the format the order import file is in: TAB Delimited or Delimited Format (specified with punctuation in the field to the right).
3.5. In the grid, select into the first column to rename the columns to match the ones in your file or use the Clone button to duplicate any existing format, give it a new name, make any necessary modifications, and then click OK to save. - If The Item Being Imported Already Exists Then:
4.1. Skip The Item will skip duplicate items if they already exist.
4.2. Update The Item will update existing items and also import new ones.
4.3. Create New Item will create new separate item records for duplicate items. - Use the Data Unique By dropdown to select the unique column: ISBN, Title, or UPC.
- Select Skip the first line if the first line in the file should be skipped if it contains column headers.
- Choose a vendor from the Vendor dropdown list. Vendor can be added under Acquisitions > Find/Add Vendor window.
- Enter the P.O. Number.
- Select Order Date.
- To import the order records under the Textbook module, check the For Textbook checkbox. By default, imported order records will be saved under the Catalog > Find/Add Item window.
- Choose the Library.
- Choose Fiscal Year.
- Choose Budget.
- Add Message to Vendor.
- Enter Notes.
- In the Order Created By field, select the person who created the order. By default, it shows the patron who logged into Insignia and imported the records. Use the ... button to find a different patron if needed.
- Select Import.
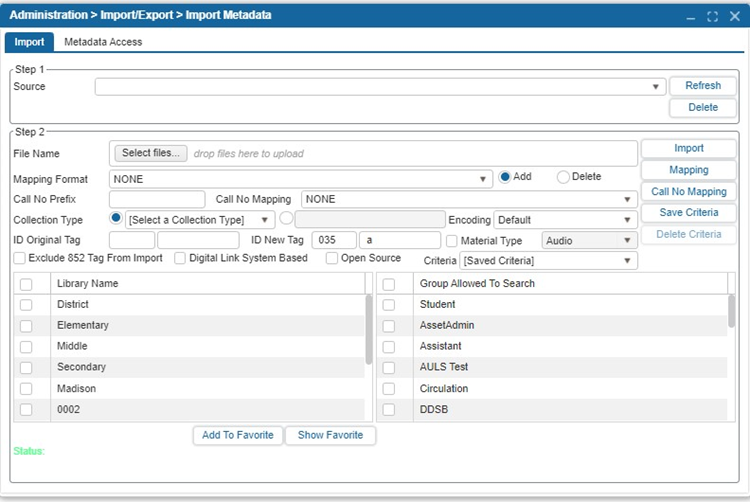
¶ Import Metadata
The Import Metadata feature allows you to import metadata provided by vendors into the ILS.
Note: Sources can be added, edited, and deleted from Administration > System Setting > Parameters.
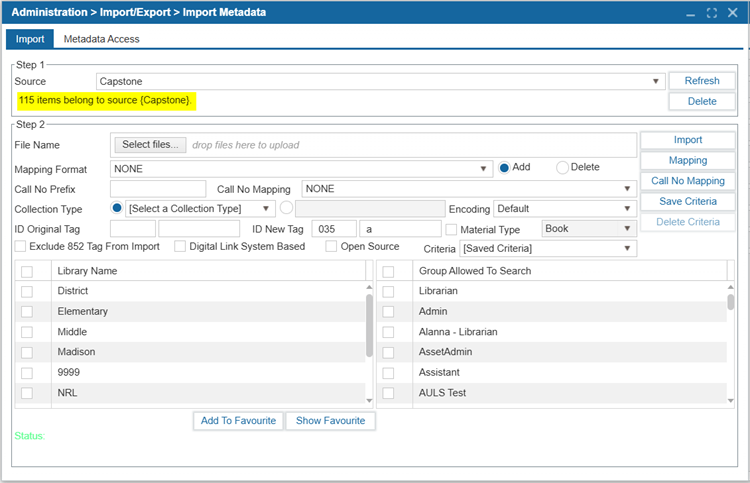
¶ Delete Existing Records from a Source
- Navigate to Administration > Import/Export > Import Metadata.
- Select the Source from the dropdown list.
- The system will show the number of items that belong to that source.
- To delete all of these item records, select Delete.
¶ Import Metadata from a Source
- Navigate to Administration > Import/Export > Import Metadata.
- Select the Source from the dropdown list.
- Select Select files… and browse your computer for the metadata import file. Alternatively, drag and drop it into the drop files here to upload area.
NOTE: This feature will only import MARC records that have been saved in either a .txt (tab delimited) or. mrc format.
- Select the settings and options to apply to the imported records upon import.
- If your MARC records have an 852 tag, the system will automatically add a copy to the record upon import. To avoid this, select the checkbox for Exclude 852 Tag From Import.
- Select Save Criteria if you would like to save the settings and options you have applied for future metadata imports.
- If there are any tags to be changed during the upload, enter tags into the ID Original Tag fields and ID New Tag fields.
- In the grid, select the Patron Groups Allowed To Search for the files.
- The Digital Link System Based checkbox controls e-resource access by library. When unchecked, access is restricted to the owning school, which can be selected from the Library Name list. Check this setting to allow the e-resource to be accessible across all sites.
- Select the material type for the imported eBooks/Items from the Material Type dropdown list.
- Select Import.
- The green Status text at the lower of the window will indicate the number of items that were read, added, rejected, and/or deleted.
NOTE: The permission to access the Import Metadata feature is located in Administration > Security.
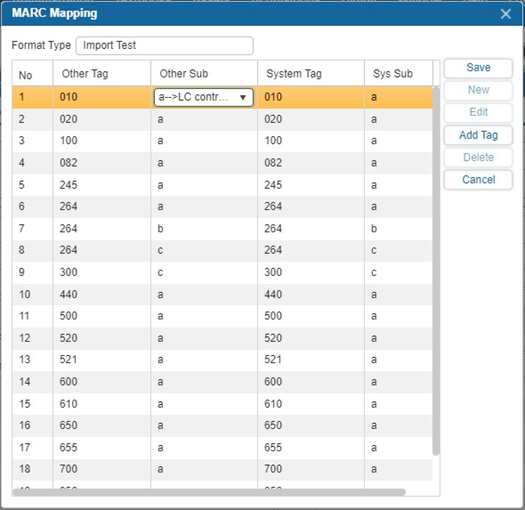
¶ Mapping Format
It is recommended a Mapping Format is set up prior to the import.
- Navigate to Administration > Import/Export > Import Metadata.
- Select Mapping.
- Select New.
- Select into the Other Tag field you wish to edit and select ….
- In the pop-up, search for a tag and select Add.
- Use the dropdown to select a subfield in Other Sub.
- Repeat step 3-5 to fill in the System Tag and Sys Sub fields.
- The Other Tag and Other Sub will be replaced with System Tag and Sys Sub when the records are imported.
- Continue adding all of the MARC fields to be changed. When finished, select Save.
¶ Call No Mapping
Call No Mapping adds predefined fields to new records cataloged in Basic Info based on the call number entered. This feature will only set fields in new item records manually created from Basic Info and will not affect records added through Z39.50.
- Navigate to Administration > Import/Export > Import Metadata.
- Select Call No Mapping.
- Select New and enter a name for the mapping format.
- Select Add and select in the grid under each column to enter information into the fields. Repeat to add more mapping settings.
- Select Save.
- Select Edit to change any previous call no. mapping.
- Select Delete to remove any previous call no. mapping formats by selecting them from the Mapping Format dropdown list.
- To remove individual rows from this window, select the row and select Remove.

¶ Metadata Access Tab
The Metadata Access tab allows users to enable searching for groups by source and library.
- Navigate to Administration > Import/Export > Import Metadata > Metadata Access.
- Select metadata source(s) from the grid.
- Choose the libraries from the second grid to select who can search for those records.
- Choose patron groups allowed to search these sources.
- Select Apply to apply the changes.
