¶ Find/Add Serials
A serial is a publication released in parts over time, such as magazines, journals, and newspapers. Insignia supports tracking serials including the title record, issues, and frequency of delivery.
NOTE: The Custom Setting 'MagazineLibraryBased' controls serial cataloging. Set the value to 0 for system-based cataloging or 1 for site-based cataloging.
¶ Create a New Serial
- Navigate to Catalog > Serials > Find/Add Serials.
- Select New.
- If you know the ISSN/Title of the serial you would like to catalog, enter it in the ISSN box or the Title box and Select Z39.50 Search By. If the system can find a matching record, several of the bibliographic fields will auto-fill. If not, the user will get an alert, ‘No Record Found’ and the information will need to be entered manually.
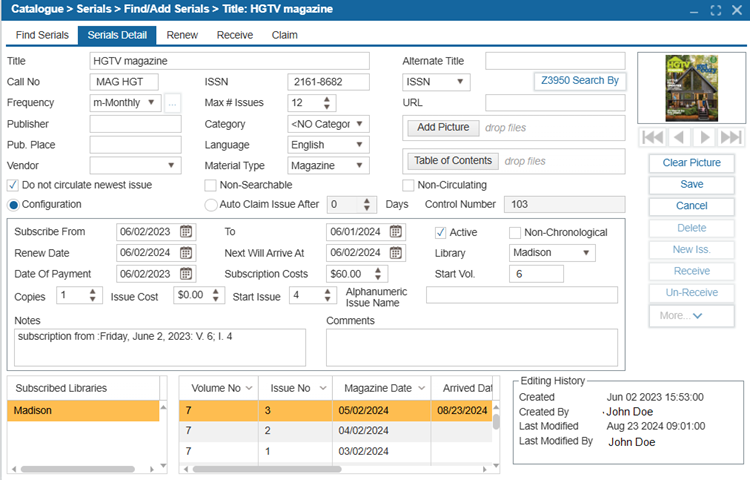
- Enter the relevant fields:
| Field | Description |
|---|---|
| Frequency | Select a Frequency from the dropdown and fill in any additional fields as needed. TIP: If the Frequency is set to Custom, click the Ellipses button to configure the custom frequency settings. |
| Call No | Enter the Call Number for the serial. |
| Max # Issues | Enter the Maximum number of issues. |
| Publisher | Enter the Publisher information for the serial. |
| Category | Select the Category from the drop-down list. TIP: Category List can be populated under the Administration > Parameters > Bib Category. |
| Pub. Place | Enter the Publication Place. |
| Language | Select the Language from the drop-down list. TIP: Language List can be populated under the Administration > Parameters > Languages. |
| Vendor | Select the Vendor from the drop-down list. TIP: Vendor list can be populated under the Acquisitions > Find/Add Vendor. |
| Material Type | Select the Material Type from the drop-down list. TIP: Material Type list can be populated under the Administration > Parameters > Material Type. |
| Alternate Title | Enter an Alternative Title for the serial (if applicable). |
| Add Picture | Use this add picture for the serial. |
| Table of Contents | Use this to upload the table of contents for the serial. |
| Non-Chronological | Use this option to Indicate that the serial does not follow a standard chronological numbering system. |
| Alphanumeric Issue Name | Enter the alphanumeric characters for the Start Issue. |
| Auto Claim Issue After | Select Auto Claim Issue After __ Days to set an individual auto claim interval for the selected serial. TIP: Users can select a default auto claim period for all serials using the Configuration setting ‘Auto Claim Issue after Days’. TIP: If you notice that a serial issue has not arrived, you can manually claim it by running a search in the "Claim" tab of the Catalog > Serial > Find/Add Serial section. Use filters such as the date range, vendor name, or title to find the missing serials. Once you have identified the missing issue, simply select the Claim button to add it to the "Magazine Claimed" report, which can then be sent to the vendor for follow-up. |
| Do not Circulate Newest Issue | Use the option Do not circulate newest issue to disable circulation of the newest issue. Once another new issue is added, the previous one is automatically set to circulate. |
| Non-Searchable | Use this option to prevent the serial and all associated issues from being searchable on the OPAC. |
| Non-Circulating | Use this option to prevent circulation of the serial. |
| Dates | Enter the following dates: Subscribe From, Subscribe To, Renew Date, Next Will Arrive At, and Date of Payment. |
| Subscription Costs and Issue Costs | Enter the Subscription Costs and Issue Costs. |
| Start Vol. and Start Issue | Enter a Start Vol. and Start Issue |
- Select Save. Select Yes to the prompt if you would like the system to automatically add issues to the grid that will be received in the future. Select No to add each issue manually.
¶ Delete Old Issues
- Navigate to Catalog > Serials > Find/Add Serials.
- Go to the Find Serials tab and select Delete Old Issue Button.
- Search for the title of the serial.
- Enter the issue date, all issues before this date will be deleted.
- Select Delete to remove the selected issues.
¶ Statistics
- Navigate to Catalog > Serials > Find/Add Serials.
- In the Find Serials tab, search for a serial by Title, Date, or other criteria.
- Select the Statistics button.
- A report will open, displaying statistical data for the selected Serial, including the Library Name, Number of Volumes, Number of Issues, and Number of Copies.
¶ Add Serial Subscriptions for Multiple Libraries
If Centralized Serials Cataloging is enabled, you can subscribe to multiple sites to the serial:
- When creating a New serial record (Catalog > Serials > Find/Add Serials > Serials Detail tab), Select Subscribe.
- Or Select Edit on an existing Serial Record to add more subscriptions.
- Select the Subscribe button.
TIP: If the Subscribe button is not visible, you can enable it by clicking the More Button and selecting the option.
- Select the libraries that will subscribe to this Serial.
- Modify the Subscription Dates and Issue start.
- Select Add.
- Select Save. Select Yes to the prompt if you would like the system to automatically add issues to the grid that will be received in the future. Select No to add each issue manually.

¶ Renew: Generate Serials Issues Before Receiving Them
This feature generates a list of Serial Titles that the library expects to receive. This should be used after a new Serial Subscription is entered into the system. The Renew Date in Catalog > Serials > Serials Detail tab is located between the Subscribe From and Subscribe To dates.
- Navigate to Catalog > Serials > Find/Add Serials.
- Select the Renew tab.
- Enter a date range for Serials up for renewal.
- Select Find.
- The magazines that meet the Date Range criteria will populate the list.
- Select the magazine titles you would like to Renew.
- Select the issue(s) and Select Renew.
NOTE: This feature is only used to track subscription information within the system. It does not automatically renew the subscription with the vendor.
¶ Receive: Add Barcodes to Serials Issues
- Navigate to Catalog > Serials > Find/Add Serials.
- Select the Receive tab.
- Enter a Date Range for Serials you would like to receive.
- To search for a specific Title, enter it in the Title field.
- Select Find.
- The magazines that fall within that Date Range will show in the results.
- Make sure the Title is checked, and Select Receive.
- If more than one copy per issue is being received and only part of the order is received, indicate the number of copies received. This will now create entry for the issue and give it a Barcode number.
- For additional copies received at a later date, go back into the same screen and update the received column. The additional copy will require a Barcode number.
TIP: You can also receive an issue by selecting it and Selecting Receive on the Serials Detail tab.
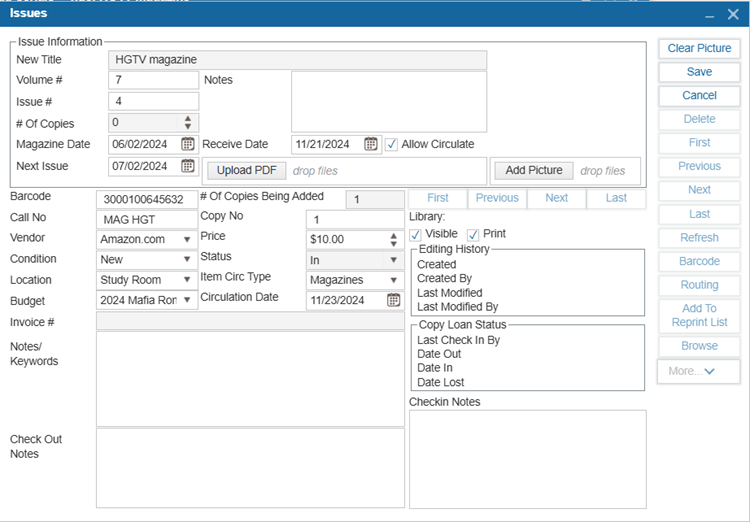
¶ Manually Add Issues
- Navigate to Catalog > Serials > Find/Add Serials and search for the serial you would like to add an issue to.
- Select the Serial and select the Serials Detail tab.
- Select New Iss.
- Fill out relevant information about the Issue you would like to add.
- Select Save.
¶ Manually Add Issues to Multiple Sites
- Navigate to Catalog > Serials > Find/Add Serials.
- Search for the Serial that you would like to add Issues to.
- Select Add Issues for Multiple Sites. Select the Libraries to add Issues to at the same time.
- Enter the Volume and Issue #.
- Modify any other information as needed.
- Select Save.
¶ Claim: Find issues that were never received
- Navigate to Catalog > Serials > Find/Add Serials.
- Select the Claim tab.
- Search by the Received From and To date. Deselect the From and To checkboxes to view all Serials. The Title and Vendor is not necessary if checking all subscriptions not received within the time frame.
- Select Find.
- The Issues that have not been received will appear in the window.
- Select the Issue you have not received and Select the Claim button. The Claimed Issues will now appear in the Claim Report.
NOTE: Magazine Claim Report can be shared with the vendor manually by printing the report or emailing the report. To automate sharing the report, setting up a schedule and using the vendor’s email.
NOTE: Magazine Claim Report can be customized under the Administration > Library Setting > System Message > Magazine Claims.
¶ Routing List: Create a List of Patrons
The ILS has a feature to route Serials through a Reader List. This allows for New Issues of a magazine to Check Out to a list of readers as they are received.
- Navigate to Catalog > Serials > Find/Add Serials.
- Search for the Serial to create for the Reader List and select it.
- Select Routing List.
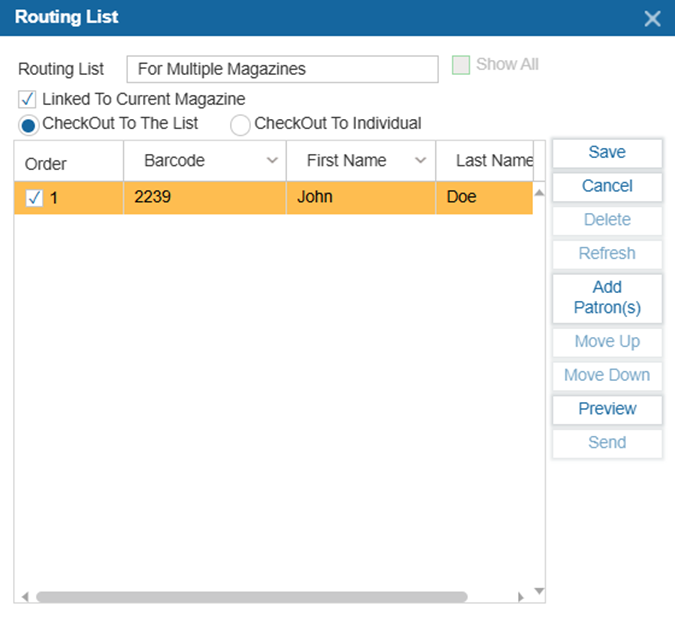
- Select New.
- Enter a Title for the list or select Show All Lists and choose an option from the list.
- Select Linked to Current Magazine to link the Routing List to the selected Serial.
- Add Patrons to the list by Selecting Add Patrons and then searching for Patrons.
- Once Patrons have been added to the list, Select Save.
- Select Edit to change the Routing List and link it to another Serial, unlink the Reader List and link the New Serial to the Routing List.
- Once a Routing List for a Serial is created, the system automatically reserves the new issue for the Patrons in the order they are listed.
¶ Binding: Bind Multiple Issues Together
Staff can bind multiple issues together.
- Navigate to Catalog > Serials > Find/Add Serials.
- Search for the Serial to you would like to bind.
- Select the Binding button.
- Select the Items in the grid to be bound together.
- Enter a Barcode for the Bound Serials or leave it blank to let the system automatically generate a Barcode.
- Select Bind.
¶ Routing: Check Out Magazine Issues to Patrons Sequentially
Once the Routing List has been created, the Routing feature can be used to Route Issues of that Serial.
- Navigate to Catalog > Serials > Routing.
- Scan or enter the Barcode of the Issue for Routing.
- Select the Routing List from the dropdown.
- The list of Patrons will be visible in the grid below.
- Select Route.
- In the pop-up window, Select Reserve to put the Issue on Reserve for the Patron, or Select Check Out to Check it out.
- If the item is being signed out to individuals, the user will be asked to Confirm which Patron the Item will be signed out to first.
- Select Slip if you would like to print a message on a slip containing the Patrons on the Routing List.