¶ My Account
The My Account section allows the patron to login to the Discovery Layer and view their borrowing information.
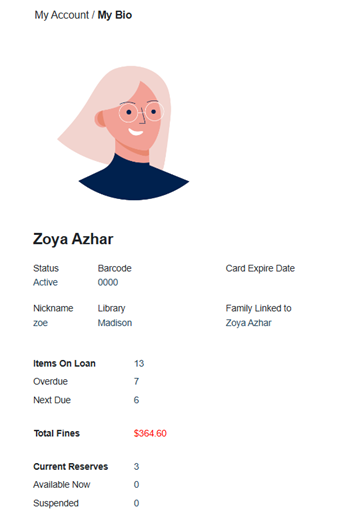
¶ My Bio
This page displays personal information for the patron such as phone number, email, address, and password. Click Edit to change information.
¶ My Favorites
My Favorites is a feature where patrons can save titles into Favorite Lists to share, reserve, email, or print.
NOTE: To set the Favorites List to show in a Kids View rather than a list, go to Administration > Library Setting > Configuration and set the type of Favorites List viewed based on the grade the patron is in.
¶ Add Titles to My Favorites
- Log in to your Patron profile.
- Navigate to My Account > My Favorites.
- Search for a Topic or Title.
- Adding to Favorites from the Search Results page:
- If Add To Favorite is displayed to the right of the Title, Click it.
- If not, click More > Add To Favorite.
- To add multiple items, select the checkbox beside each item or select the Search Results checkbox to select all items displayed on that page. Click More > Add to Favorite.
- To add a single item, click Add to Favorites on the Details page of the Title.
- Select a Favorites List from the dropdown, or select New Favorite Title and enter in the name of a new Favorites List.
- Click OK, the Title will be added to that List.
- The following options are available in My Account > My Favorites: Share, Reserve, Email, and Print.
¶ Share Favorites
- Select whether Favorites Lists can be Public or if they are Read-Only.
- Public: Any patrons this Favorite List is shared with can edit the Name and Contents of the List.
- Read-Only: Any patrons this Favorite List is shared with can only view the list.
- Search for patrons to share lists with by their last name and click Find.
- Click Share beside the patron’s name and their name will be added to the lower grid.
- Click Unshare to stop sharing the list with a patron.
¶ Reserve Favorites
- Click Reserve
- Indicate what items from the list you would like to reserve.
- Click OK.
NOTE: Select “Go to My Account Reserves” to view your list of current reserves.
¶ Email Favorites
- Select the Email button
- Fill out the Email field to set the email subject.
- Select the Email Scheme to determine how the list will be formatted.
- Add Notes to be included in the body of the email.
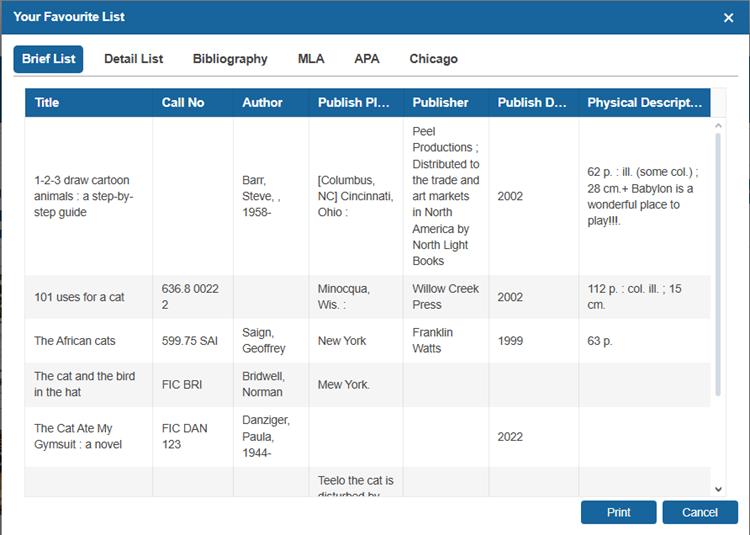
¶ Print Favorites
- Select the print button.
- Select the format you would like to print. Options include
Brief List, Detail List, Bibliography, MLA, APA, and Chicago.
¶ Preferences
Set preferences for:
| Preferece | Description |
|---|---|
| Notification Language | Select one of the language options for notifications. Use the default system setting or select English, French, or Spanish. |
| Notification Method: Email Me What Is New | Select the checkbox for Email Me What Is New to receive notifications when new titles are added. |
| Notification Method: Need Phone Call Service | Select the checkbox for Need Phone Call Service to receive notifications by phone. |
| Notification Method: Need SMS | Select the checkbox for Need SMS to receive notifications by text message. |
| Notification Method: Need Email Service | Select the checkbox for Need Email Service to receive notifications by email. |
| Loan Tracking History | Enable or disable Loan Tracking. This feature keeps track of what you have borrowed in case you need to refer to it in the future. |
| Library Preferences | Select a default Pickup Library where you would like to pick up your reserves. This will be the default library shown in the Reserve Request dropdown. |
¶ Notification/Alerts
The Notification/Alerts page shows notifications which have been sent and shows the type of notification sent, message, date sent, and status. Patrons can read the messages and click Read It to change the status to read, or click Delete to remove the message from the list.
¶ Reading Program
The Reading Program feature in OPAC allows users to participate in library reading programs, track their reading activity, and view rewards or achievements.
- Select My Account > Reading Program
- In the reading tab:
2.1. Using the dropdown select a Program Name
2.2. Enter book details for a title you have read and select the Add. This will populate the table.
2.3. Select the books in the table and click the Read button to confirm your reading activity. This will add the book to the History tab. - In the Gift tab:
3.1. View the table for a list of reading programs, possible gifts and if a gift was awarded to the user. - In the History tab:
4.1. From the upper table, select a program you would like to view details on.
4.2. In the lower table, view a list of books you read as part of the program, and any gifts awarded.
4.3. Select a title to edit the reading date.
¶ Communication
The Communication page displays communication between patrons and library staff. Library staff can send messages that appear here through the Patron > Find/Add Patron > Communication tab. Patrons can reply to these messages by using the Reply Message field and clicking Reply.
¶ Peer to Peer
The Peer to Peer feature allows patrons to create a friend list with other library patrons.
¶ Make a Friend Request
- Log in to your Patron Profile.
- Navigate to My Account > Peer To Peer.
- Select the Request tab.
- Search for a patron by their First Name, Middle Name, or Last Name. Click Search.
- Click Request to send a friend request.
- To block a patron, click Block.
¶ Accept a Friend Request
- Log in to your Patron Profile.
- Navigate to My Account > Peer To Peer.
- Select the Accept tab.
- Any requests made to be your friend will be listed in the grid.
- Click Accept to accept the friend request and add them to your friends list.
- Click Block to block the patron.
¶ Friend Settings
This tab allows you to set up what information is shared with friends.
- Log in to your Patron Profile.
- Navigate to My Account > Peer To Peer.
- Select the Friends tab.
- For each friend, select the checkboxes to share your lists of Items Checked Out, Items on Reserve, and/or Borrowing History.
- Click Save.
¶ Create a Friend Group
Creating friend groups in Peer To Peer is useful if several friends have been added and the patron would like to view specific groups of friends instead of searching through an entire list.
- Log in to your Patron Profile.
- Navigate to My Account > Peer To Peer.
- Select the Friends tab.
- Click Edit Group or use the dropdown in the Group column and click [New].
- Enter a new Group Name and click Save.
- To rename a group, select Rename, enter the new Group Name, and click Save.
- To delete a group (this will not delete your friends), click Delete beside the group in the grid.
- Click OK.
- To add friends to the group, use the dropdown in the Group column for the selected friend and select the group.
- Click Save.
¶ View Shared Information
- Log in to your Patron Profile.
- Navigate to My Account > Peer To Peer.
- Select the Shared Info Center tab.
- Use the dropdown to select a Group if needed to narrow down the Friends list.
- Use the Friends dropdown to select a friend.
- If they have shared their loan, reserves, and history with you, use the tabs to view the information.
¶ Recommended List
The Recommended List shows items recommended to the specific patron from the library staff. The patron specific recommended list can be accessed in the ILS through Patron > Recommended List. From this page, patrons can select an item and text the details of it to a phone number or reserve the item.
- Log in to your Patron Profile.
- Navigate to My Account > Recommended List.
- Select the recommended item to access text or reserve options.
- To text the item information to a number, click Text. Fill in the necessary information and Confirm the text message.
- Click Reserve to reserve the item. Use the dropdowns to select the Pickup Library and click Reserve. Select Go to My Account Reserves to go to the reserves page afterwards.
¶ Computer Booking
The Computer Booking page allows patrons to book a computer for a specific time period. Default booking times can be changed in Assets > Computer.
- Log in to your Patron Profile.
- Navigate to My Account > Booking > Computer Booking.
- Use the Calendar to Select a Date.
- Select a Time slot and Computer to book.
- Click Book.
- Your name will show up in the Computer Booking grid and a Password is provided on the upper right.
- To log into the computer at the designated time, use your Patron ID/barcode and password provided.
- To cancel a booking, select it in the grid and click Cancel.

NOTE: To enable Computer Booking under My Account in the Discovery Layer, go to Administration > Library Setting > Configuration in the ILS and select the Self Computer Booking checkbox.
¶ Request Document Delivery
The Request Document feature allows users to request specific documents from the library. Once submitted, the request is processed, and users can download the document when it becomes available.
- Under the My Account menu, select Request Document.
- Click the Request button to initiate the request.
- Fill in all required fields marked with an asterisk (***), including Title, Article Title, Author, ISSN, Publication Date, Vol/Issue, Pages, Need By, and DOI/PubMed ID.
- Click the Request button in the Document Delivery Detail window to submit the request.
- Once the document request is fulfilled, click the Download button to access the attached file.
¶ Historical Data
¶ Loan/Fine/Booking History
Allows patrons to view their loan, fine, and booking history.
- Log in to your Patron profile.
- Navigate to My Account > Historical Data > Loan / Fine / Booking History.
- To change the date range, click the calendar icons and select the preferred dates.
- Select Show Result in Grid if you would like to view the results in a grid layout.
- Click Search.
- Click Preview to view a printable list of items.
NOTE: Patron’s can update their loan history tracking preferences from My Account > My Bio > Loan Tracking. Selecting Yes allows the library to track your loan history. Selecting No prevents the library from tracking your loan history. Selecting Depends on System Settings defaults to the library’s loan tracking policy.
¶ My Borrowing
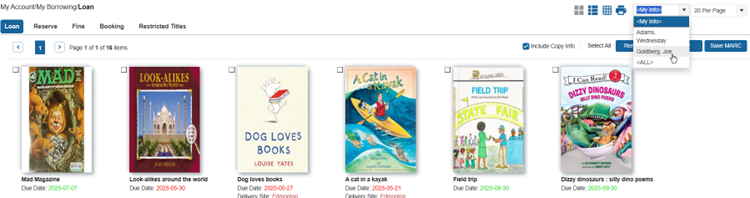
¶ Loan
Displays items currently Checked Out and allows the patron to Renew items.
- Log in to your Patron profile.
- Navigate to My Account > My Borrowing > Loan.
- Select Show Result in Grid if you would like to view the results in a grid layout.
- Click Renew on the right side of an item to renew the individual item.
- To renew multiple items, use the checkboxes to select the items and click Renew on the upper-right.
- To renew all items, select Select All and click Renew on the upper right.
- To preview selected items, use the checkboxes to select the items to include. Click Preview.
- Select Show Result in Grid if you would like to view the results in a grid layout.
- Click Save MARC to save a .txt file of the item’s MARC record.
- Click Preview to create a printable list of Current Items on Loan.
- View Statistics on the left.
¶ Reserves
Displays reserved/booked items and allows the patron to Suspend, Resume, or Cancel Reserves.
- Log in to your Patron Profile.
- Navigate to My Account > My Borrowing > Reserves.
| Options | Description |
|---|---|
| Show Result in Grid | Select Show Result in Grid if you would like to view the results in a grid layout. |
| Show Completed | Select Show Completed to view a list of reserves that you have requested and checked out. |
| Show Cancelled | Select Show Cancelled to view a list of reserves that either you have cancelled or have been cancelled by the library. |
| Show Expired | Select Show Expired to view a list of expired reserves which you did not pick up from the pickup shelf in time. |
| Suspend | Click Suspend to the right of the Title to temporarily pause the Reserve until a certain date. This is useful if you are going on a trip or do not need the reserve immediately. TIP: Suspended reserves are displayed in red font. |
| Resume | Click Resume to resume a suspended reserve before the automatic resume date. |
| Cancel | Click Cancel to cancel a reserve |
| Select All | To Suspend, Resume, or Cancel multiple reserves, use the checkboxes to the left of the titles (or choose Select All to select all titles in the list) and click Suspend, Resume, or Cancel at the upper right of the window. |
| Save MARC | Click Save MARC to save a .txt file of the item’s MARC record. |
| Preview | Select a list of items using the checkboxes and click Preview to create a printable Reserve list. |
¶ Fine
Displays all outstanding fines.
- Log in to your Patron Profile.
- Navigate to My Account > My Borrowing > Fine.
- Select Show Result in Grid if you would like to view the results in a grid layout.
- Click Preview to create a printable Fine List.
¶ ILL
Displays current external Interlibrary Loans.
¶ Request New Books
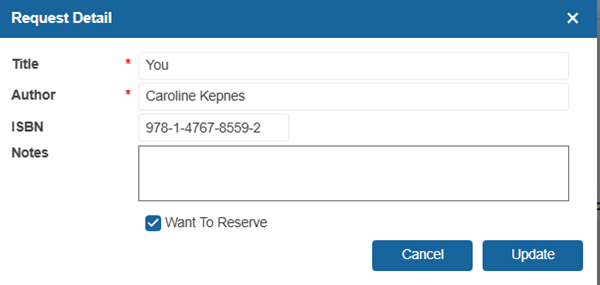
The Request New Books page allows patrons to make suggestions for purchase.
- Login to your Patron profile.
- Navigate to My Account > Request New Books.
- Click Request a Book.
- Enter the Item request information.
- Select Want To Reserve if you want to reserve the item when it is available.
- Click Save to submit the request.
- Repeat steps 3-6 for each request needed.
- To view requests in the ILS, go to Catalog > Cataloging > Find/Add New Request.
NOTE: Patrons can enable/disable the "Want to Reserve" option in OPAC under My Account > My Borrowing > Request New Books using the custom setting ‘AllowToReserveInOPACSuggestPurchase’.
NOTE: Librarians can check new book requests under Catalogue > Cataloguing > Find/Add New Request and Circulation > Alerts > New Request tab.
TIP: When a patron suggests a new purchase via the OPAC, the system verifies if the title is already in the library’s collection.
- If the title exists, the patron will be alerted: “The Library already owns these titles.” A list of related titles will also be provided.
- If the title is not found, the patron may proceed with submitting a new purchase request.
¶ Restricted Titles
The Restricted Titles tab allows students to view what titles are restricted. From this window, parents or guardians can also edit the list of restricted titles. This might be applied due to policy restrictions, parental discretion, or age-appropriateness.
To add a title to the restricted list, search for a book using the Search for Books field. Select the book you would like to restrict from the lower table and select the Restrict button. The title will be added to the upper table.
To remove a title from the restricted list select a book from the upper table and select the Unrestrict button.
¶ Family Link
If the main family card holder logs in to their account, they can view all borrowing information for all family members by using the dropdown list and selecting the family members’ name.
¶ Booking
¶ My Media Booking
The My Media Booking page allows patrons to view room bookings and asset reserves/bookings they have made. They can also cancel the bookings from the Discovery Layer.
- Log in to your Patron Profile.
- Navigate to My Account > Booking > My Media Booking.
- Use the dropdown to select the type of bookings to view (Asset or Room).
- If Asset is selected, use the second dropdown to select to view Booking or Reserves.
- Click Cancel on the upper right.
- To cancel a single booking, click Cancel to the right of the booking.
- To cancel multiple, use the checkboxes on the left of the bookings or click Select All.
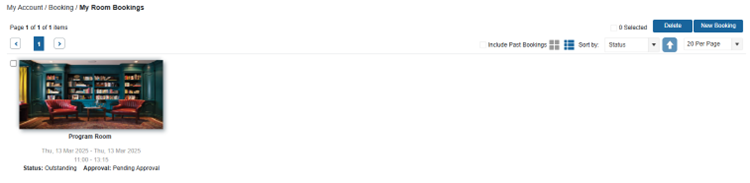
¶ My Room Bookings
To view the status of room bookings, patrons can navigate to My Account > Booking > My Room Bookings.
- Log in to your Patron Profile.
- Navigate to My Account > Booking > My Room Bookings.
- To cancel a booking, click Delete.
- To modify an existing booking, click Edit.
- Select a date and time range, then click Save. To return to the My Room Bookings screen without making any changes, click Room Bookings.
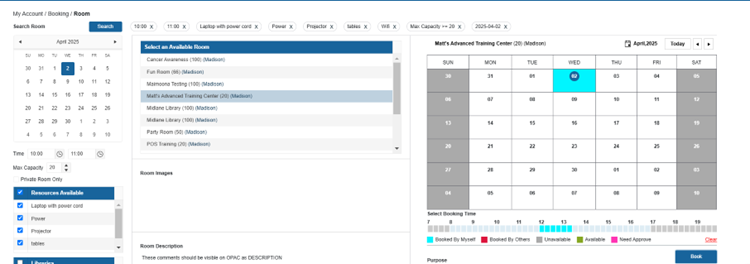
¶ Book Room
The Book Room page allows patrons to book rooms for specific dates and times. They can also modify and delete bookings through the My Room Bookings page.
- Log in to your Patron Profile.
- Navigate to My Account > Booking > Book Room.
- Select a Date to start searching for available rooms. To view a specific time range, select the checkbox beside From and/or To, and select a time for each.
- Select room under Rooms Available.
- Click Search.
- On the lower left, select the Room you would like to see the availability for in the calendar.
- On the calendar, select a date. Note the following legend:
7.1. Grey: Unavailable date.
7.2. Blue: I have a current booking on that date.
7.3. Red: Another patron has a current booking on that date. - On the Time scale, select a start time, and click again to select an end time. Note the following legend:
8.1. Grey: Unavailable
8.2. Light blue: Available time.
8.3. Green: Selected time period.
8.4. Light Green: Setup time and Takedown time set in Asset > Find/Add Rooms.
8.5. Pink: Selected time period awaiting library staff approval. - To clear the time range and reselect times, click Clear.
- Enter the Purpose the room booking for the library’s review.
- Click Book. The room booking may need to be approved by a librarian before it is confirmed.
NOTE: When a patron books a room, an automatic email will be sent to the patron. If the booking requires approval, the email will confirm that the patron’s booking has been received and will be reviewed shortly. Once the librarian approves the booking, the patron will receive a follow-up email confirming the approval. These messages can be edited in Administration > System Message.
NOTE: If the library has set a start time and end time in Asset > Find/Add Rooms , these will be automatically reflected in the time scale.
¶ Events
¶ My Events
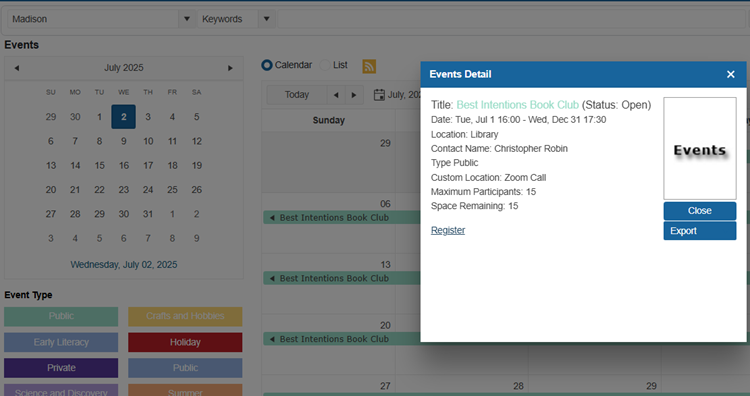
To view a list of events that you have registered for, navigate to My Account > Events > My Events.
- Log in to your Patron Profile.
- Navigate to My Account > Events > My Events.
- To provide feedback for a past event, click on the event in the calendar and click Feedback.
- In the pop-up window, rate the event from a scale of 1-10, with 10 being the most satisfied.
- Add any comments as needed.
- Click OK to submit the feedback.
- To cancel your registration for an event, click on the event in the calendar and click Cancel.
¶ Manage Events
The OPAC has the Manage Events feature which allows you to create new events or modify/delete existing ones.
- Log in to your Patron Profile.
- Navigate to My Account > Events > Manage Events.
- To create a new event, click Create Event.
- Enter the details for the event.
- Click Submit. The event may need to be approved before it appears on the OPAC.
- To edit or delete an existing event, click on the event in the calendar and click Edit or Delete.
¶ Point of Sale (POS)
Insignia’s Point of Sale (POS) feature is used to order inventory from the library.
¶ Create an Order
To create an order from the OPAC:
- Navigate to My Account > POS > Create Order.
- Select an item from the inventory using the Order button on the desired item, or search for a specific item using the search bar.
2.1. Select or an existing order from the dropdown.
2.2. Edit the required quantity.
2.3. Select ‘Go to My Orders’ if you would like to be redirected to the My Orders screen.
2.4. Select Ok.
¶ My Orders
To view and submit your existing orders:
- Navigate to My Account > POS > My Orders.
- To view the order detail, select an order from POS Current Orders column.
2.1. The quantity of inventory in the order can be modified, or items can be removed from the order until the order is submitted. - When the details of the order have been finalized, select Submit to send your order to the library.
3.1. Select your desired payment type from the dropdown menu.
NOTE: From the ILS interface, staff can view new POS orders through Circulation > Alert > POS. Staff can view the order detail in POS > Checkout.
¶ Order History
- Navigate to My Account > POS > Order History.
- Use the date filters to filter the list of past orders.
¶ Textbooks
The textbook feature allows patrons to search for textbooks using various search criteria. They can select libraries from the dropdown menu and search by title, keyword, author, call number, course, and more. The search results will display the relevant textbooks.
¶ Order Textbooks
- Navigate to My Account > Textbooks > Create an Order.
- Search for the textbook(s) to add to the order.
- Select the Order button beside the title in the search results.
3.1. By default, the system will create a new order with a default order number. To add a textbook to an existing order, select it from the “Order” dropdown menu.
3.2. Enter the required quantity.
3.3. Uncheck “Go to My Orders” to continue browsing the catalog and add more textbooks to the order.
3.4. If this is the last textbook to be added, keep “Go to My Orders” selected and click OK.
¶ My Order
- Navigate to My Account > Textbooks > My Orders.
- Select an order from the Textbook Orders Menu to view the details of the order
2.1. The quantity of textbooks in the order can be modified, or textbooks can be removed from the order until the order is submitted. - When the details of the order have been finalized, select Submit to send your order to the library site.
¶ Textbook/Courses
The Textbook/Courses tab allows authorized users to create courses and link textbooks. Students can search existing courses to view required textbooks.
- Go to My Account > My Courses.
- To create a course and link a textbook:
2.1. Enter a course Title and course Code. Select if the course is active (visible to students).
2.2. Select Add.
2.3. Search for a textbook title, and select Link.
2.4. The selected textbook will move to the top of the page under the Textbook window, indicating that it has been successfully linked. - To view the textbooks linked to a course:
3.1. Search by Teacher, Course Code, or Course title.
3.2. Select a course from the courses table.
3.3. View the linked textbooks from the TextBooks table.
¶ Online Resources
¶ OverDrive Checkouts
Displays all OverDrive eBooks currently checked out and allows patrons to check in the book if they finish reading it before the due date.
- Log in to your Patron profile.
- Navigate to My Account > My Borrowing > OverDrive Checkout.
- Click OverDrive Read to open the e-book.
- Click Check In to return the e-book prior to its due date.

¶ OverDrive Holds
Displays all OverDrive eBooks currently on reserve and allows patrons to cancel their reserve if they do not want the reserve anymore.
- Log in to your Patron profile.
- Navigate to My Account > My Borrowing > OverDrive Hold.
- Click Cancel to cancel the reserve.