¶ Check Out
The Check Out window is the main point of access for many of the circulation features of the ILS. From the Check Out interface, the user can access many circulation features. For example, they can Check Out, Renew an item, mark an item Lost, mark an item Claimed Returned, Reserve an item, or Collect/Waive fines.
- Navigate to Circulation > Check Out > Check Out.
- Scan the Patron’s Barcode or enter the Patron’s Name in the Name/Barcode field.
TIP: Typing the first few letters of the patron’s first and last name will still provide results (e.g. typing "joh wic" or “wic joh” and pressing enter will retrieve the patron information for John Wick).
3. Navigate to the relevant tab to perform the desired circulation action.
TIP: The custom setting CheckoutPatronInfo allows users to customize what patron information is displayed in the checkout window. Options include displaying patrons name, patron group, patron circulation type, and/or phone number. This custom setting can be adjusted using Admin All credentials.
NOTE: The Configuration setting "Pop up message for fines" is available under Administration > Library Setting > Configuration > Circulation. When enabled, a message displays in Circulation > Check Out > Check Out for patrons with fines, stating, "Patron has $##.## of fines on their account."
¶ Feature Buttons
| Button | Name | Description |
|---|---|---|
 |
Find Patron | Select this button to search for a patron by a variety of search criteria. Select Union in the pop-up window to search for a patron from another library. NOTE: The security permission, 'View Personal Info in Find Patron Dialog', is available under Administration > Security > Circulation. This permission allows administrators to control whether users can view personal information (Phone #, Address, and Email Address) when searching for patrons using the Find Patron icon. |
 |
Patron Info | Select to open the Patron > Find/Add Patron window and view the selected patron’s detailed patron profile. |
 |
New Patron | Select to open the Patron > Find/Add Patron window and create a new patron record. |
 |
Previous Patron | Select to view the previous patron’s circulation profile. |
 |
Find Copy Barcode | If the copy barcode is not available, select this button to search by search criteria. |
 |
Check Out Receipt | Print a receipt for items currently checked out. TIP: To adjust the font size on Checkout and Fine Slip Receipts, adjust the custom settings 'RollerPrinterReceiptBodyFont' and ‘RollerPrinterReceiptHeaderFont’, using Admin All credentials. Changes apply to receipts in Circulation > Check Out > Check Out and Circulation > Check Out > Collect Fines. Note: The Configuration setting 'Include cover image in Checkout Receipt' is available under Administration > Configuration. When enabled, the cover images of the checked out items will be included on Check out receipts. |
 |
Receipt Margin | Modify the margins for the receipt. |
 |
Notify | Select to send out an email listing items checked out or overdue by the patron. A dialog box will confirm if the email was sent successfully. NOTE: The Security permission "Standard Checkout Notify" is available under Administration > Security > Circulation > Check Out. If this permission is disabled, the Notify button will be removed from the Circulation > Check Out > Check Out window. NOTE: The Custom Setting "CirculationNotice" is accessible when logged in as Admin All. Set the value to 1 to automatically send notification emails to patrons upon item check-out. |
 |
Patron Notes | Select to add any tracking notes, warning information, or textbook warning information, which will pop up when the patron record is opened again in Check Out. Select the Notes History tab to view a history of notes that have been added to the patron account. |
 |
Catalog Temp | Select to quickly check out an item by creating a temporary item, which will be prompted to be cataloged when it is checked back in. |
 |
Copy Notes | Select to add notes to the copy record. The history of notes will be linked to the copy barcode under the Notes History tab under Copy Information. |
 |
Computer Booking | This button will open the Assets > Computer window where a computer booking can be made for the patron. |
¶ Feature Options
| Option | Description |
|---|---|
| Set Due Date | Users can change the default due date for any item being checked out by selecting the Set Due Date To checkbox and selecting a new date. Until the Check Out window is closed or the checkbox is unchecked, the manually set due date will remain for all items checked out. NOTE: A Configuration setting, Reset 'Set Due Date' is available. When enabled, this setting ensures that if you use the "Set Due Date" option in Circulation > Check Out to change an item's loan period, the due date will automatically reset when the next patron is scanned, rather than retaining the previously selected date. You can find this setting under Administration > Configuration. |
| Current Patron Only | Select to change the due date for the current patron only. Uncheck the Current Patron Only checkbox to make the due date change for other patrons as well. |
| Show Library Items | Filter the Items On Loan list to show Catalog items. |
| Show Textbook | Filter the Items On Loan list to show Textbooks. |
| Show Asset | Filter the Items On Loan list to show Assets. |
| Show Current Library Only | Filter the Items On Loan list to show only items belonging to your library. |
| Search Local Patron Only | Select to only search for patrons in the local library. When unchecked, it will search for the Patron Name/Barcode in all libraries in the Union. NOTE: To ensure that the 'Union' option is unchecked by default in the Check Out > Select a Patron pop-up window, adjust the following settings. Navigate to Administration > Configuration, and enable the 'Default Circulate Local Patron Only' option. Additionally, navigate to Administration > Security, select Circulation, then Check Out, and disable the 'Search for Local Patron' setting. |
| Internet Agreement Signed | This status will show on the Check Out window to indicate that the patron has signed an Internet Usage Agreement, which allows them to book computers. This status can be modified by clicking Patron Info icon to navigate to Patron > Find/Add Patron > Patron tab and making sure that the Internet Usage Agreement checkbox is enabled. |
| Loan Information | The Loan Information box to the left of the patron photo shows a summary of the Patron’s current circulation statistics. |
| Override (Pop-up) | The ILS is designed to enable users to override restrictions. If a patron cannot Check Out items due to the constraints on their loan profile, a pop-up will prompt the user to enter the Override Password. The Override Password can be set in Administration > Configuration. |
| SRP (Checkbox) | When enabled, checked-out items will be due on the date specified in the "Summer Reading Due Date" setting under Administration > Configuration. |
| Family Card | The Family Card checkbox is available specifically for public libraries. When enabled, it displays the items checked out by family members under the parent’s record in the Check Out window. These items will also appear under Patron > Find/Add Patron > Document/Family tab within the Parent's account. NOTE: The ‘SelectFamilyCardInCheckOut’ custom setting will determine if this checkbox is selected by default. To adjust this setting, navigate to Administration > System Setting > Custom Setting using Admin All credentials. |
| Collection Type Dropdown | Enables libraries to manage duplicate barcodes across different collection types, ideal for those transitioning from systems that permitted duplicates. By enabling the "Collection Type Barcode" setting under Administration > Configuration, users can catalog items with duplicate barcodes tied to specific collection types. During checkout, selecting a collection type ensures the system correctly handles duplicate barcodes, allowing seamless circulation management. |
| Library/Asset/Textbook Radio Buttons | Select the relevant radio button to check out that item type. Note: If barcodes for Textbooks, Assets and Catalog items are unique, there is no need to select the checkbox to identify the barcode being scanned as a textbook or library book as long as Smart Barcode Checkout is enabled in Administration > Configuration. |
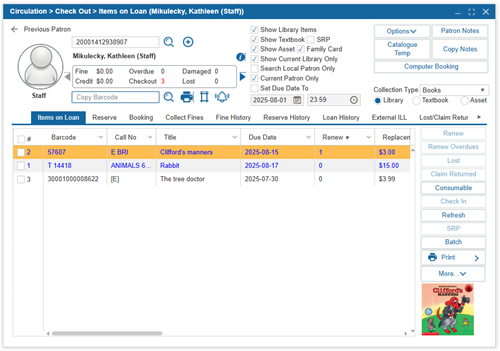
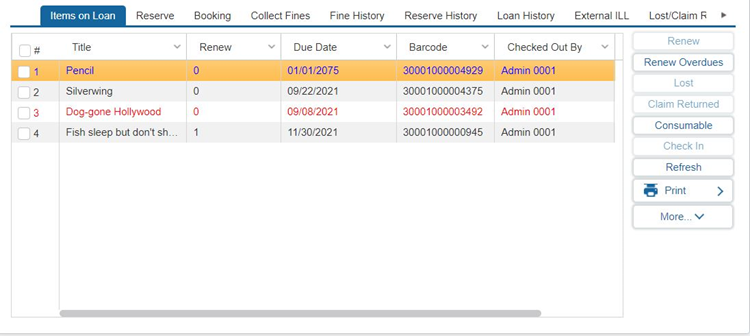
¶ Items on Loan Tab
The Items On Loan tab lists all items currently checked out to the patron. The primary purpose of this tab is to check out items to a patron. However, from this tab, items can also be Checked In, marked as Lost, Claimed Returned, or Renewed.
To Check Out an Item:
- Navigate to Circulation > Check Out > Items on Loan tab
- Enter the Patron’s barcode
- Scan or type in the item’s barcode in the Copy Barcode field. If the item has been successfully Checked Out to the patron, it will appear in the Items on Loan grid.
TIP: In Circulation > Check In and Circulation > Check Out > Check Out, once an item appears in the bottom grid after check-in or check out:
- Double-clicking the copy barcode opens the item's record under Catalogue > Cataloguing > Find/Add Item.
- Double-clicking the patron’s name in the Checked Out By column opens the patron's record under Patron > Find/Add Patron.
NOTE: The Configuration setting "Display Overdrive in Checkout" under Administration > Configuration is available. When enabled, OverDrive checkouts will be displayed in the Circulation > Check Out > Items On Loan tab during checkout. Enabling this feature may slightly increase the time it takes to load a patron profile under the Check Out window.
TIP: The Batch Check Out can be useful when checking out multiple items at a single time.
¶ Item Color Legend
The color legends provide librarians with a quick and intuitive way to identify the status of items at a glance, such as distinguishing overdue items, items on loan, and those checked out today. This visual aid helps streamline circulation management and improve operational efficiency.
Red: Overdue
Black: Checked out
Blue: Checked out today
The library name is listed in the Items on Loan grid and books from another library will show up in a different color. This tab can be accessed directly at Circulation > Check Out > Check Out.
NOTE: When 'Normal_Checkout_Black_Text’ is enabled, all checked-out items will display in black text. To enable this setting, navigate to Administration > System Setting > Custom Setting using Admin All credentials.
¶ Find Copy Barcode
If a patron needs to Check Out an item but the Item Barcode is not present to scan, use the following steps to locate the item.
- Select Find (the magnifying glass icon next to the Copy Barcode field).
- In the pop-up window, search for the book by Title, ISBN, Author, Subject, Keywords, etc.
- Select Search and highlight the appropriate item.
- Select Check Out.
- Repeat this process until all items have been checked out and close the pop-up window.
TIP: This window will also allow you to Reserve a book or recall a book already checked out.
¶ Renew Button
The Renew Button will allow a loan period to become lengthened if the book is already checked out.
- Select the checkbox next to the item(s) to renew.
- Select Renew.
NOTE: The length of the renewal period depends on the renewal period set in Administration > Circulation Types and the value of ‘Due Date After Renew’ in Administration > Configuration. The Due Date after Renew options include Due Date + Renew Period, which extends the due date based on the original due date plus the defined renewal period, and Today + Renew Period, which sets the due date based on the current date plus the renewal period.
¶ Lost Button
The Lost Button is used to indicate an item as lost and the patron will be charged the Replacement Cost of the item. Lost items will be displayed under the Collect Fines tab and also under the Lost/Claim Returned tab. To mark an item as lost:
- Select the checkbox next to the item(s) to be declared lost.
- Select the Lost button.
- A pop up will ask you to confirm the Replacement Cost to be charged to the patron. Confirm the default replacement cost for title or specify a different value and select OK.
NOTE: To enable refunds for lost items upon check-in, two settings must be configured. First, the AutoRefundLost must be enabled in Administration > Custom Setting. Second, ensure that No Refunds on Lost Items That Are Paid is unchecked in Administration > Configuration. With these settings configured, the system can prompt for a refund when a lost item is returned, streamlining the refund process and enhancing circulation management.
NOTE: Insignia supports automatically declaring a book as lost after a specified number of days. To enable this functionality, adjust the configuration settings regarding ‘Auto Declare An Overdue Book As Lost’ under Administration > Configuration.
NOTE: Insignia supports charging patrons for lost items depending on the condition of the item. To enable this functionality adjust the configuration setting "Lost Charge" in Administration > Configuration.
NOTE: To enable charging for lost items based on acquisition date, adjust the ‘Charge by Acquisition Date’ setting in Administration > Configuration II > Circulation II tab. This allows setting specific percentages for items acquired within different time frames to reflect depreciation in replacement charges.
¶ Claim Returned Button
The Claim Returned button is used if a patron claims to have returned an item but the record shows that item has not yet been Checked In. The item will be removed from the Items on Loan screen and marked with a status of Claimed Returned. The system will not charge any overdue fines following the date it was claimed returned.
- Select the checkbox(s) next to the item(s) you want to claim returned.
- Select Claim Returned.
- Input the date when patron claims to have returned the item and select OK.
NOTE: If a claimed returned item is subsequently checked in, the system updates its status to In, and the item is removed from the Lost/Claim Returned tab under Circulation > Check Out.
¶ Consumable Button
The Consumable button will allow a patron to Check Out a consumable item (e.g. a notebook) that they will keep for a price and are not expected to return. Before they can be checked out, consumable items need to be cataloged using Catalog > Find/Add Item.
- Select Consumable.
- Enter the Title or ISBN number of the item you want to Check Out into the pop-up window and select Find.
- Select the checkbox beside the item you wish to Check Out.
- If needed, adjust the number of items you want to Check Out by selecting the number listed in the Checkout column in the grid.
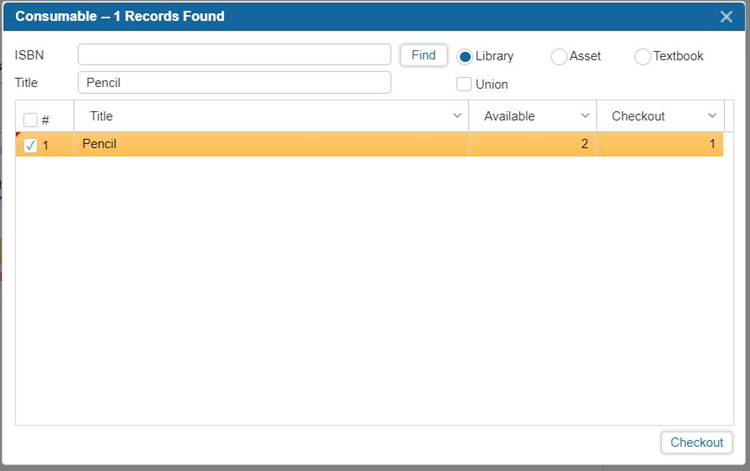
5. Select Checkout.
6. The item, including the price charged, will appear in the Items on Loan grid.
¶ Check In Button
You can check-in items from the Check Out window by selecting the items and then clicking Check In.
Check In is useful if a patron changes their mind during Check Out and does not want to borrow the item.
- Select the checkbox(s) next to the item(s) you want to select in.
- Select Check In.
TIP: Insignia recommends that users typically check in items using the Check In window for full functionality.
Clicking on the print icon will provide the user with five options for printing:
| Option | Description |
|---|---|
| Print All | Select to print all items currently checked out to the patron. |
| Print Overdue | Select to print only Overdue items. |
| Print Textbook Check Outs | Select to only print a list of textbooks checked out to the patron. |
| Preview | Select to print a list of all items checked out to the patron today. |
| List | Select, and a pop-up will prompt you to choose between printing the report for this patron for today’s date only (Yes) or printing all items on loan (No). |
¶ Additional Options in Items on Loan
Additional options on the Items on Loan tab include:
| Option | Description |
|---|---|
| Refresh | Refresh brings up new data in the Check Out window that may have not appeared right away when updating information elsewhere. For example, if you modified the current patron’s details, use Refresh button to display the most up-to-date information. |
| SRP (Button) | If items were checked out without the "SRP" checkbox selected but should have the Summer Reading Due Date, the user can select the checkboxes next to those items and use the SRP button on the right to update them to SRP checkouts, applying the SRP due date instead of the regular due date. NOTE: Navigate to Administration > Library Setting > Find/Add Summer Reading Program to add or search for a summer reading program in Insignia. |
| RFID | When the RFID button is selected, a window will pop up and the IP address of the RFID device must be applied. Ensure 'Remember IP' is checked to retain this IP address for future uses of the RFID feature. Items are then placed on the RFID pad and the 'Read Barcodes' button is selected to retrieve the barcodes from the RFID tags. The barcodes of the items will be listed in the popup window and then selecting 'OK' applies the barcodes to the patron as checked-out items. |
| Batch | When selected, this feature allows a user to scan multiple barcodes, one at a time, then complete a single checkout. |
¶ Reserve Tab
The Reserve tab lists all the items currently on reserve for the patron and also allows users to place additional items on reserve. Items that are available for pickup are shown in green. This tab can be accessed directly through Circulation > Check Out > Reserve.
TIP: Clicking the Find icon (magnifying glass next to the Copy Barcode field) opens the Find Item pop-up window. In this window, the Union checkbox is checked by default for public libraries with multiple sites when the custom setting 'PublicLibrary' is set to 1 (enabled). This setting can be accessed by logging in as Admin All.
NOTE: Insignia provides options for the library to send an automated notification when a reserve is placed, and when a reserve becomes available. These notifications can be sent immediately when the reserve is made available, or as part of the daily check process. To adjust these settings, ensure 'Email Patron When Reserve Becomes Available' is enabled under Administration > Configuration > Automation, and adjust the custom settings 'SendReserveConfirmationInDailyCheck' and 'SendAvailableReserveTypeInDailyCheck' using Admin All credentials.
NOTE: Insignia provides an option to disable interlibrary loans meaning that the system will not allow reserves on items from other libraries in the system and all reserves must be made from the patron’s local site. To enable this functionality, please adjust custom setting ‘DoNotAllowInterLibraryLoanWhenReserve’ using Admin All credentials.
¶ Find
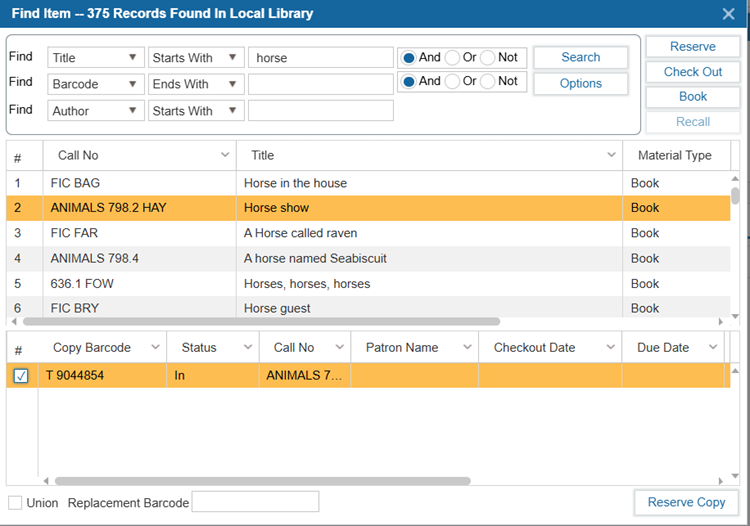
The Find button allows you to locate an item you wish to Reserve.
- Select Find (the magnifying glass icon next to the Copy Barcode field).
- In the pop up window, use the dropdown to select your search option and enter your search term. Select Search.
- To search for items from other libraries, enable the Union checkbox.
- To reserve multiple items, hold Ctrl or Shift and click on the desired items.
- Select an item from the search results. Select Reserve to complete the reservation.
- To reserve a specific copy, select the Title then select the Copy in the lower grid and select Reserve Copy.
- Close the pop-up window when you have finished reserving items. The items you have reserved will now appear in the Reserve List.
TIP: Staff can place copy-level holds in the ILS while hiding this functionality from patrons on the OPAC. To enable this functionality, adjust custom setting “AllowReserveCopy” using Admin All credentials.
¶ Cancel Reserve
Cancel will permanently remove selected reserve(s) for the patron.
- Select the checkboxes beside the reserve(s) you wish to remove.
- Select Cancel.
- In the pop-up window, select Yes to notify the patron or No to cancel without notice.
- If you selected Yes, use the dropdown menu in the next prompt to select the message you would like to send to the patron.
TIP: Cancellation 1 and Cancellation 2 can be customized in Administration > Library Setting > System Message.
¶ Check Out Button
Check Out allows you to select a Reserved Item and Check Out to the patron rather than scanning the individual barcodes.
- Select the checkboxes beside the reserve(s) you wish to Check Out.
- Select Check Out.
¶ Reserve List Button
The Reserve List brings up a list of all of the patrons who have placed a reserve on a selected item.
- Select the checkboxes beside the reserved item(s) you wish to view.
- Select Reserve List. A window will pop up that displays the list of patrons with reserves on the item.
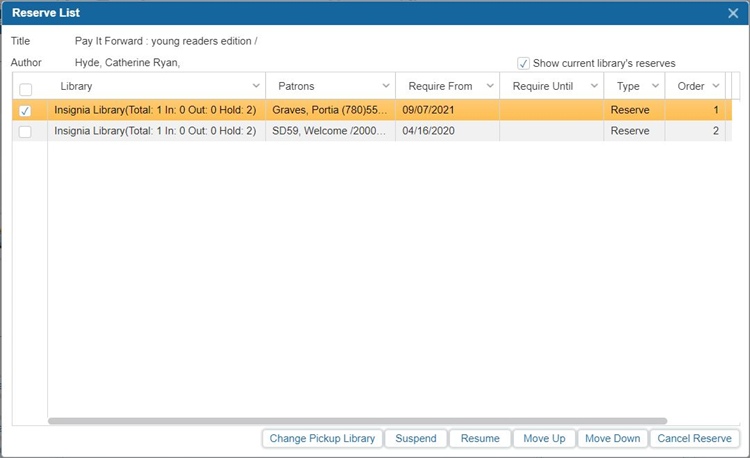
3. From this window, you can Change Pickup Location, Suspend/Resume a Reserve, change the order on the Reserve List by selecting Move Up/Move Down, and Cancel Reserve.
4. When you are done modifying the Reserve List, close the window using the X in the upper right-hand corner of the Reserve List window.
¶ Suspend Button
Suspend will take a patron out of the reserve queue temporarily. When a reserve is suspended, the patron will continue to move up the hold queue normally. When they reach the top of the queue, the system will automatically skip to the next available patron until the reserve has been resumed.
- Select the checkboxes beside the reserves you wish to suspend.
- Select Suspend to remove the patron from the Reserve Queue temporarily.
- When you select Suspend, the Auto Resume Suspend Reserve pop-up window appears. Check the Auto Resume Date option, choose the desired date for the system to resume the reserve automatically, and click OK.
- Suspended items will show in red on the Reserve screen.
NOTE: Users can prevent items on the Pickup Shelf from being suspended by disabling the configuration setting ‘Allow Suspend Reserve If On Pickup Shelf’.
NOTE: Users can enable the system to send a notification to staff if a Reserve on the pickup shelf is suspended, allowing staff to process the reserve for the next patron in line. To enable this functionality, enable the configuration setting "Email Librarian When a Reserve on Pickup Shelf Is Suspended”.
¶ Resume Button
Resume will reactivate a reserve in the reserve queue.
- Select the checkboxes beside the Reserves you wish to resume.
- Select Resume to add the patron back into the Reserve Queue. The red text will turn black.
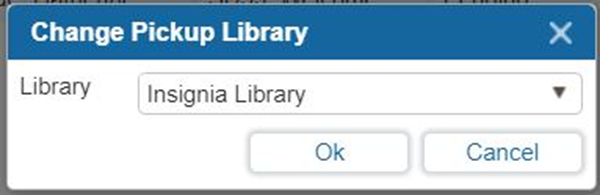
¶ Change Pickup Library Button
Change Pickup Library allows a user to change the location the reserve will be routed to for pickup.
- Select the checkboxes beside the Reserve you wish to change the pickup location for.
- Select Change Pickup Library.
- A new window will appear. Select the new pickup location from the Library dropdown and select OK.
¶ Reserve by Series
The Reserve by Series feature allows users to automatically place holds on subsequent titles within a series when a title from a series is reserved. This feature ensures a seamless borrowing experience for patrons who wish to read the entire series in order.
NOTE: To enable this functionality, adjust the Custom Setting ‘ReserveBySeries’.
When placing a reserve on a series item:
- Navigate to Circulation > Check Out > Reserve tab.
- Scan or enter the item's barcode.
- A prompt will appear asking whether you'd like to Reserve by Series.
- If enabled (checked), the system will place a reserve on subsequent volume in the series.
- If disabled (unchecked), no reserves will be placed on subsequent titles.
- Click OK to confirm the selection.
- When the reserved item is checked out, the system will automatically place a hold on the next volume in the series.
TIP: If the system does not place a hold on the next item, ensure the following:
- Under the Catalog > Cataloging > Find/Add Item > Basic Info II tab, confirm that all series items share the same Series Title and have the correct successive volume number in the Volume field.
- Volume information should not be entered in the Series Title field, as this may prevent the system from correctly identifying the sequence.
This feature simplifies series borrowing, making it easier for patrons to access titles in the correct reading order.
¶ Booking Tab
The Booking tab lists all the items booked for a patron. The booking feature enables a specific copy or copies to be held for future dates. Items that are available for pickup show in green. Cancel a booking by selecting the checkbox beside the item then selecting Cancel.
¶ Find
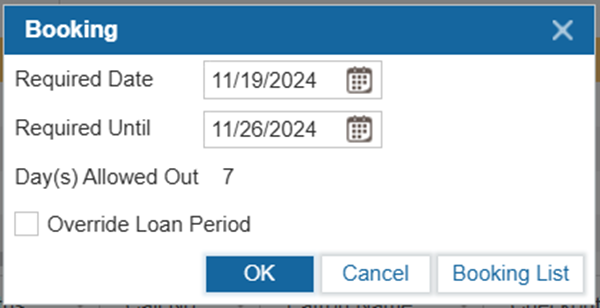
The Find (the magnifying glass icon next to the Copy Barcode field) button allows you to locate an item you wish to book.
- Select Find. A new window will pop up that allows you to search for an item.
- Search for the item by entering various search options (e.g. Title, Author, ISBN, etc.) and Search.
- Select the item from the search results. You can also book multiple items from the list at once by pressing Ctrl or Shift. To reserve a specific copy, select the title, then select the barcode in the bottom grid. When you are done selecting items, select Book.
4. A new window will pop up that allows you to select the date range for the booking. If the range is greater than the number displayed by the “Day(s) Allowed Out” heading, you will need to select Override Loan Period. Select OK when you are done setting the date range. The items you have booked will now appear in the patron’s Booking List. Select the Cancel button to close this window, or select the Booking List button to check if the selected item has any bookings or reserves.
¶ Collect Fines Tab
Fees or fines such as lost or overdue items can be viewed in the Collect Fines tab. In this tab, payment can be collected in full or partial amounts, or waived. There are several types of fines including Overdue, Damaged, Checkout Charge, and Lost. Ad hoc (user-created) fines can be assigned to a patron which can be added in Administration > System Settings > Parameters > Fine Type, allowing libraries to customize the fine types based on their specific policies.
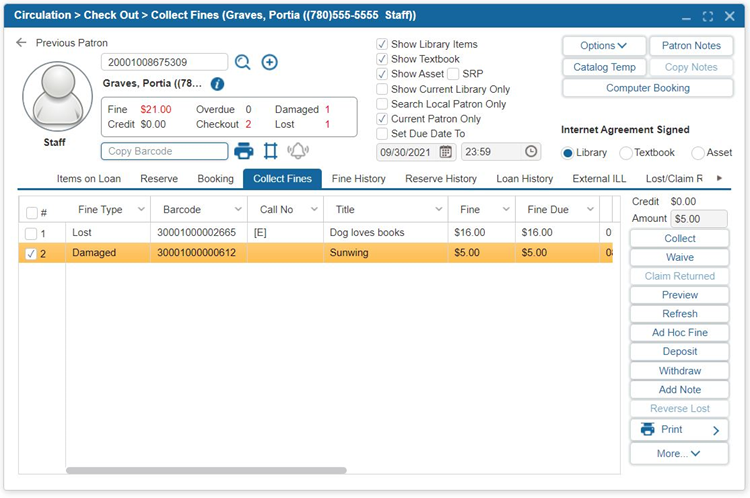
¶ Collect Button
The Collect button will allow you to collect payments for assessed fines or fees.
- Select the checkbox next to the fines that will be collected.
- Select Collect.
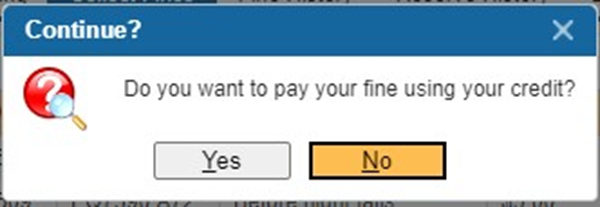
- If the patron has a credit on file, you will see a pop up asking if the credit should be used for payment. Click Yes if they would like to pay their fines using their credit. If they do not have a credit on file or if their credit is not enough to cover the full amount of their fines, continue to step 4.
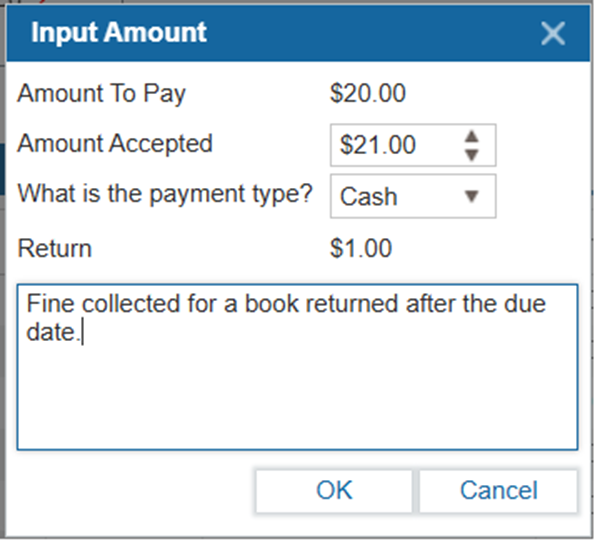
4. Enter the amount of money received from the patron and select the payment type using the Amount Accepted dropdown.
5. If the patron wishes to deposit additional funds to their account, select the Keep Return As Credit box.
6. Select the payment type the from What is the payment type? dropdown.
TIP: Customized payment types for fines collection can also be added under Administration > System Setting > Parameter > Payment Type. Libraries can tailor these payment types to align with their specific policies.
7. Enter a note to explain the details of the fine collected, such as the reason or specific conditions.
8. Select OK.
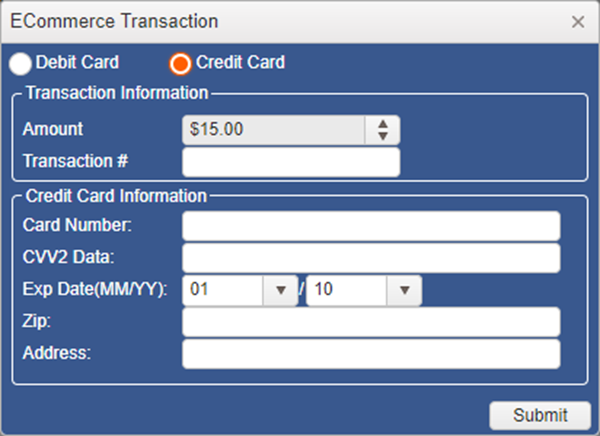
9. On the next window, if the patron is paying by Debit Card or Credit Card, enter the corresponding Transaction Information and Debit/Credit Card Information and select Submit. This will only appear if eCommerce has been enabled.
TIP: Insignia provides an option to round cash payments to the nearest whole number or 5-cent increment. To enable this functionality, adjust the configuration setting "Round Off to the Nearest Whole Number".
¶ Waive Button
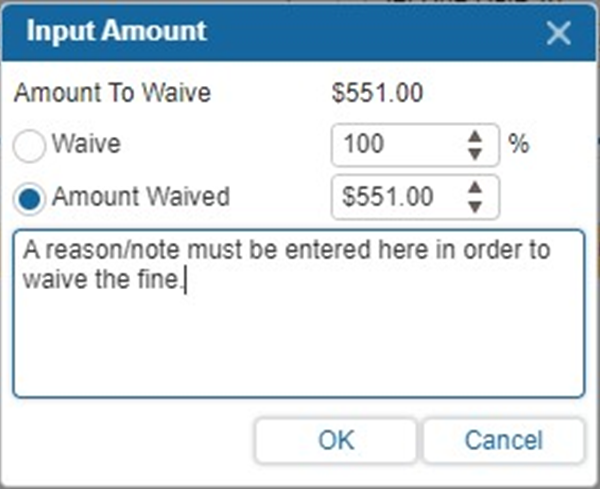
The waive button allows users to dismiss fines for a patron.
- Select the checkbox next to the item(s) for which fine(s) will be waived.
- Select Waive.
- You can either choose to Waive a percentage of the fines or an exact Amount Waived.
- Enter a note explaining why the charge has been waived.
- Select OK.
NOTE: The system includes a setting that allows users to waive a fine without adding a note. To enable this functionality, enable custom setting 'Prompt_Waive_Fine_Reason' using Admin All credentials.
NOTE: The system includes a setting that allows the system to waive fines automatically after a period of time for active and/or inactive patrons. To enable this functionality, adjust the ‘Auto Waive Lost Fine’ setting in Administration > Configuration.
¶ Ad Hoc Fine Button
Ad Hoc Fines are fines manually added by users. They do not need to be attached to a catalog record.
- Select Ad Hoc Fine.
- Specify the Fine Type from the dropdown and enter the amount charged.
NOTE: Ad Hoc Fine Types can be added in Administration > System Setting > Parameters > Fine Type.
3. You may also enter a note explaining the fine.
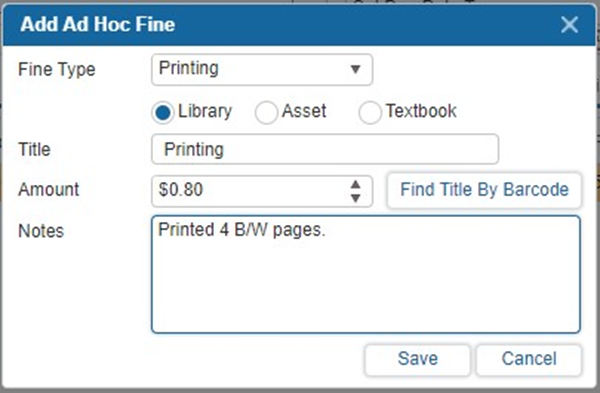
4. If the fine is for an item (e.g. a patron damaged a book that is not currently checked out to them), scan the associated Barcode into the Title field to retrieve the item title and select Find Title By Barcode.
Select OK.
Hovering over the Printer Icon button shows the fine-related reports and receipts that are available to print.
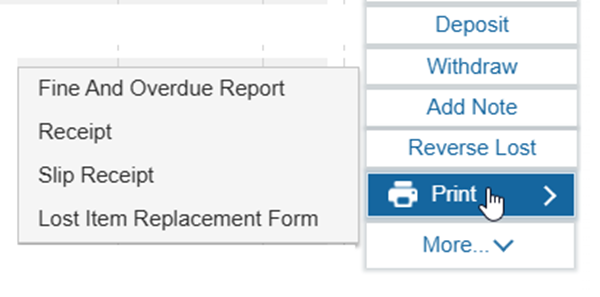
- Fine and Overdue Report: This report displays a printable list of all of the fines that the patron currently owes.
1.1. Select Fine And Overdue Report.
1.2. The Call Number, Notes, Title, Barcode, Fine Type, Fine Assessed, and Fine due will print with the patron’s Name and Address in the request to pay the Fine.
TIP: To include Cover Images in the Fine And Overdue Report, navigate to Administration > Library Setting > Configuration and enable the setting ‘Include Cover Image In Check Out Fine/Overdue Report’.
2. Receipt: The receipt will generate a report of the patron’s monetary transactions over a selected date range.
2.1. Select Receipt.
2.2. Input the date range of the receipts recorded.
2.3. Select OK.
2.4. All Fines, Paid or Waived, and Deposits and Withdrawals associated with the patron over the selected date range will display in a printable format.
3. Slip Receipt: This will automatically generate and print a receipt for all of the patron’s Fines paid and/or Waived on the current day.
3.1. Select Slip Receipt.
3.2. If a receipt printer has been installed, the receipt will automatically print. Otherwise, it will be displayed on screen.
4. Lost Item Replacement Form: This form is available for processing lost item replacements.
4.1. Select a lost item.
4.2. Select the Print button.
NOTE: To add this option to the Print menu, enable the custom setting 'UseLostItemReplacementReport' using Admin All credentials.
¶ Additional Functionality
The following functions are also available in the Collect Fines tab:
| Function | Description |
|---|---|
| Claim Returned | If a patron has been fined for a lost item, it is still possible to change its status to Claim Returned from the Collect Fines tab. 1. Select the checkbox next to the item(s) you want to claim returned. 2. Select Claim Returned. |
| Preview | Selecting Preview will display a printable report of a patron’s selected fines. 1. Select the checkbox next to the fine(s) you want to print. 2. Select Preview. |
| Refresh | Selecting Refresh will bring up new data into the Collect Fines tab that may not have appeared right away when updating information elsewhere. For example, if paid at another location, selecting Refresh would display the most up-to-date information. |
| Deposit | This feature allows you to Deposit funds into a patron’s account. This may be useful if the patron would like to maintain a credit balance on their account for future fees (e.g. printing fees). |
| Withdraw | If a patron would like to withdraw the funds they have stored as credit, this can be done using the Withdraw feature. |
| Add Note | Add a note to a selected Fine. The note will appear in the Notes column in the Collect Fines tab. |
| Reverse Lost | Reverse a lost fine and move the item back into the patron’s Checked Out items (Items On Loan tab) with the original date that the item was due on. |
¶ Fine History Tab
The Fine History tab displays the patron’s history of Fines Paid, Waived, and Reversed. As shown in the following image, the upper grid displays the fine amounts that have been collected. The middle grid displays what the fine amounts collected were applied to. The lower grid shows the patron’s deposits and withdrawals.
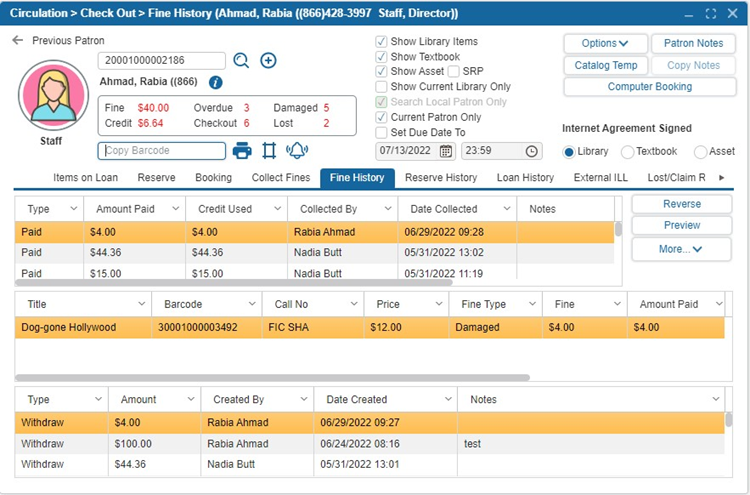
¶ Reverse Button
The Reverse button allows you to change the status of a past fine. For example, you can change the status of a Fine from Paid to Reverse if it had been incorrectly marked as Paid.
- Highlight the Fine you would like to Reverse.
- Select Reverse, then select Yes on the pop-up warning. This will put the amount owing back onto the Collect Fines tab.
¶ Preview Button
Selecting Preview will display a printable report of a patron’s fine history.
¶ Reserve History Tab
The Reserve History tab displays the patron’s history of reserved items. Selecting Cancelled/Expired Items will show only the expired and canceled reserves, while selecting Picked up Items will display only the reserved items that were picked up.
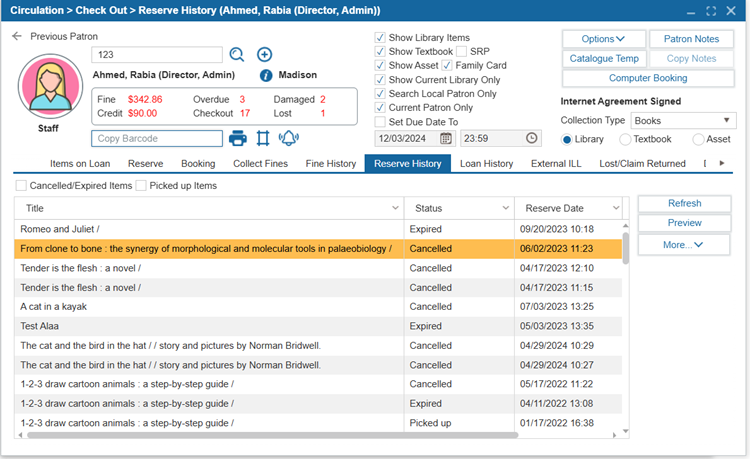
¶ Refresh
Selecting Refresh will bring up new data into the Reserved History tab that may not have appeared right away when updating information elsewhere.
¶ Preview
Selecting Preview will display a printable report of the patron’s reserve history.
¶ Loan History Tab
The Loan History tab presents a list of all items that have been checked out by the patron. If a fine was attached to the item, it will also appear in this tab. The lower grid will show any transactions that patron made towards the selected item.
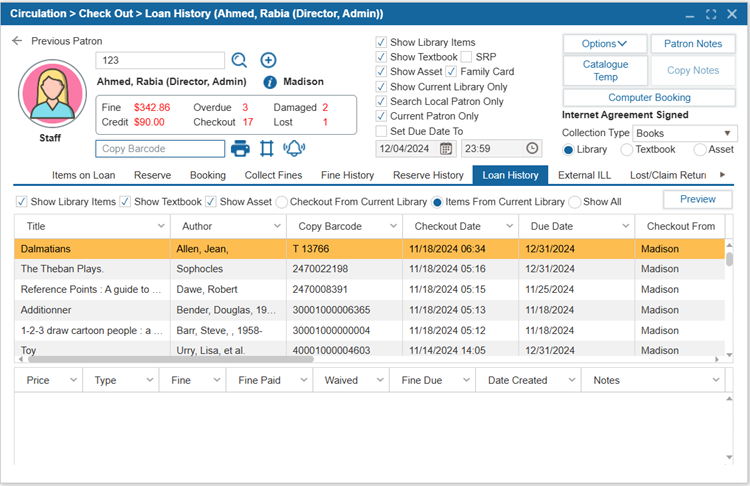
¶ Preview
Clicking Preview will display a printable list of the patron’s loan history.
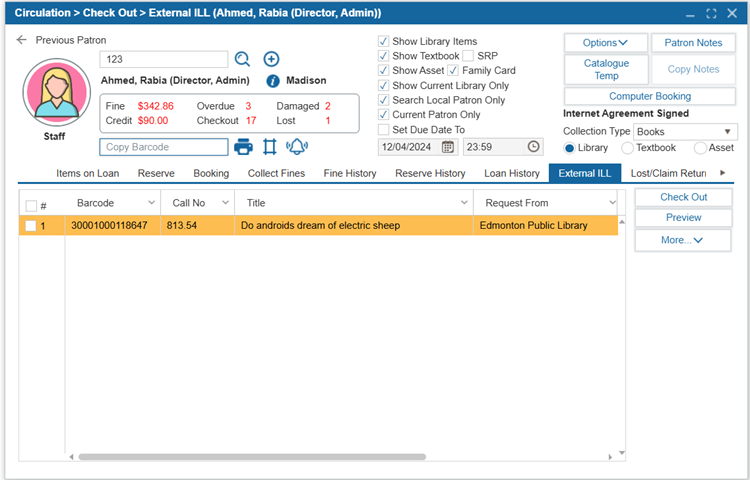
¶ External ILL Tab
The External Interlibrary Loan tab displays the patron’s requests for titles from an external library. The information provided includes both the lending library and any comments. External ILL records can be cataloged through Catalog > Cataloguing > External ILL Cataloguing.

¶ Check Out
Check Out allows you to Check Out ILL items out to the patron rather than scanning the individual barcodes.
- Select the checkbox beside the ILL(s) you wish to Check Out.
- Select Check Out.
NOTE: The system allows users to scan an External ILL barcode and check out the item directly from the Circulation > Check Out > Items on Loan tab instead of the Circulation > Check Out > External ILL tab. To enable this functionality, enable the custom setting "External_ILL_Scan_External_Barcode" using Admin All credentials.
¶ Preview
Clicking Preview will display a printable report of the Patron Current ILLs.
- Select the checkbox next to the ILL(s) you want to preview.
- Select Preview.
¶ Lost/Claim Returned Tab
The Lost/Claim Returned tab displays all the items that have been marked Lost or Claimed Returned for the patron. It includes a Current Status column which will show if the item was found or still remains missing.
¶ Lost
The Lost button allows you to mark a book as Lost if it was previously marked as Claimed Returned. This will automatically add any applicable fines and charges to the patron’s account.
- Select the item you would like to change the status to Lost for.
- Select Lost.
¶ Delete
If a Claim Returned item is checked in (Copy Status = In), you can delete this history from the patron's record.
- Select the item you would like to delete from the Lost/Claim Returned record.
- Select Delete.
¶ Stolen
Selecting Stolen will allow a user to mark an asset as stolen rather than lost.
- Select the item whose status you would like to change to Stolen.
- Select Stolen.
NOTE: Only Assets can be marked as stolen.
¶ Damaged Items Tab
The Damaged Items tab displays a list of all items marked as damaged for the current patron.
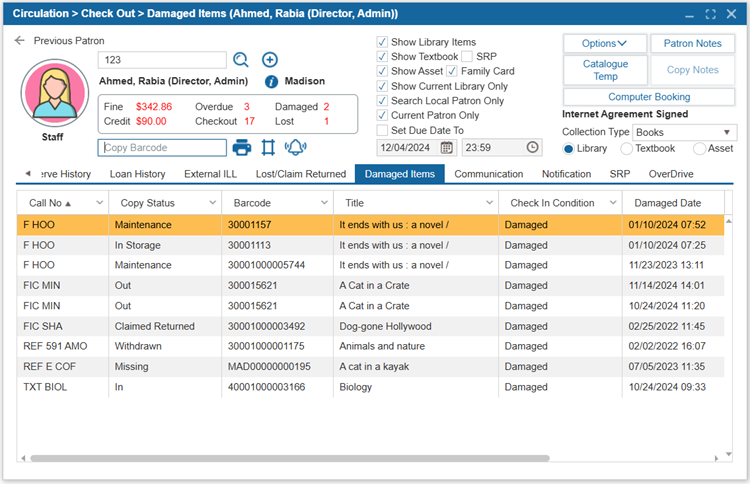
NOTE: To mark an item as damaged, go to Circulation > Check In , select the ‘Check In Damaged Item’ checkbox, and then scan the item to check it in.
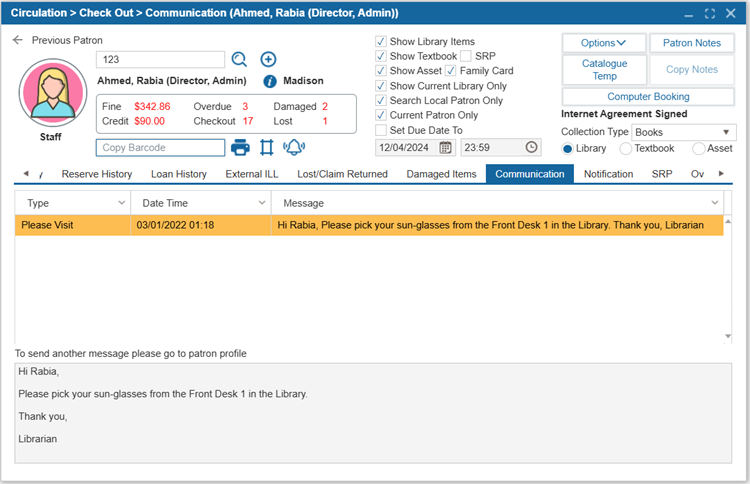
¶ Communication Tab
The Communication tab displays a history of messages between the library staff and the patron. These messages are added in Patron > Find/Add Patron > Communication Tab. These messages are visible to the patron when they log into the OPAC.
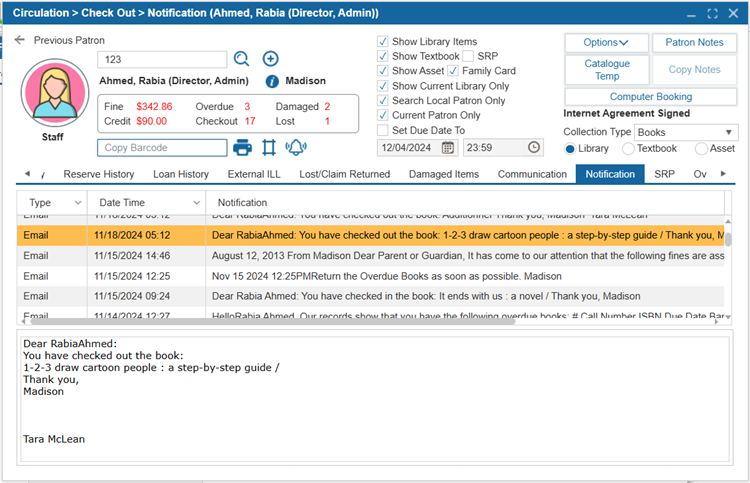
¶ Notification
The Notification tab provides a history of all automatic notifications that have been sent to the. It displays the type of notification and the contents of the message.
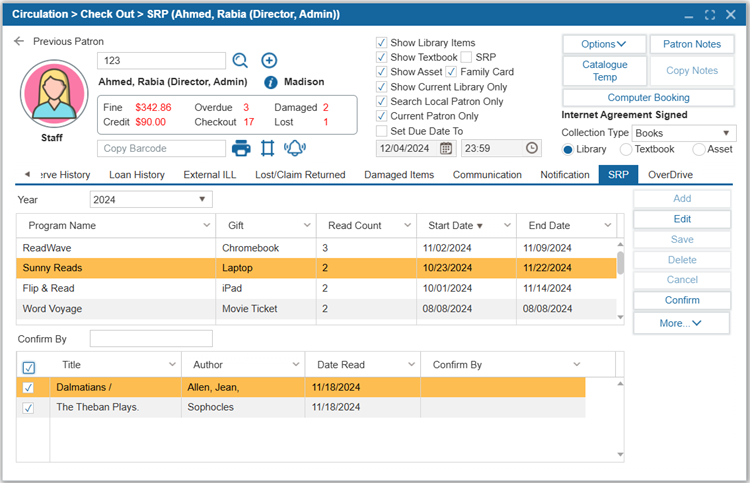
¶ SRP
The Summer Reading Program (SRP) tab shows the patron’s participation in any Summer Reading Programs. The window will display all summer reading programs for a selected year. The current year will be selected by default. The upper grid displays details about the SRPs including the Program Name, Gift for participating**, Read Count** required to receive a gift**,** and the Start Date and End Dates.
The lower grid is used to track the books a patron has read toward receiving the SRP Gift. To update the Patron Read Count for a currently running SRP:
- Select Edit. This will activate Add, Save, Delete, and Cancel.
- Select Add. This will add a title space to the lower grid. The fields for Title and Author are clickable. Type in the title and author of the book you would like to add.
- Select Save.
- To confirm an entry, enter your name in the Confirm by box and click Confirm.
NOTE: Gifts can be assigned to patrons under Administration > Library Setting > Find/Add Summer Reading Program > Summer Reading Program Gift tab.
¶ OverDrive
The OverDrive tab under Circulation > Checkout allows users to view a patron's OverDrive digital checkouts. To display OverDrive checkouts in the Items on Loan tab, the configuration setting ‘Display OverDrive in Checkout’ under Administration > Configuration must be enabled.
NOTE: Enabling this setting may impact the loading time of a patron's profile.