¶ Circulation
The Circulation module in Resource Manager allows patrons to create and manage bookings for Resource Center materials.
¶ Create A Booking
¶ From the ILS
Bookings for the Resource Center must be made while signed in to the Resource Center site. Being signed in to a library site only permits patrons to book items from their library.
- Navigate to Circulation > Check Out > Check Out.
- Search for the patron in the Patron Name/Barcode field to load up their profile.
- Select the Booking tab.
- Select Find (the magnifying glass icon next to the Copy Barcode field).
NOTE: The Custom Settings SendRMBookingNoticeDaily and SendRMCheckOutNoticeDaily control how automated email notifications are sent for item bookings and checkouts:
SendRMBookingNoticeDaily:
- Set to 0 to send booking notices immediately upon booking.
- Set to 1 to consolidate booking notices and send a single email daily as part of the end-of-day job.
SendRMCheckOutNoticeDaily:
- Set to 0 to send checkout notices immediately upon checkout.
- Set to 1 to consolidate checkout notices and send them in a daily summary email.
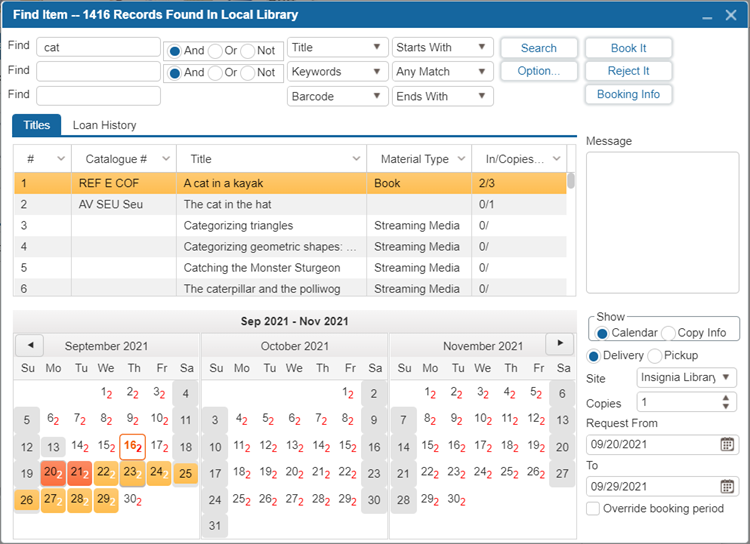
- Search for the title you would like to book.
| Option | Description |
|---|---|
| Reject It (button) | Allows the user to cancel a booking request. When clicked, a pop-up window titled Unbooking Reason appears. The user must select an appropriate reason from a drop-down list before proceeding. Unbooking reasons can be customized or added as needed under Administration > System Setting > Parameters window. |
| Booking Info (button) | Opens a Booking Info popup window showing all bookings made on the selected item. This allows staff to review existing bookings and availability before placing a new booking. |
| Loan History (tab) | The Loan History tab allows the user to make bookings by first entering a date range in the From and/or To fields and clicking Find History. The system will display all items that were booked within that range. The user can then select an item from the list, choose the desired booking dates by either entering them in the Request From and To fields or selecting dates from the Calendar, and then select Book It to complete the booking. |
| Show: Calendar / Copy Info | Choose to display either a Calendar (visual date selection) or Copy Info (details about item copies). |
| Delivery / Pickup (radio buttons) | Choose if the resource will be delivered to the patron or picked up by them. |
| Site (dropdown) | Select the site (branch) where the booking is being made. Note: Sites can be set up under Patron > Find/Add Site window. |
| Copies | Set the number of copies the patron wants to book. |
| Override Booking Period (checkbox) | This checkbox allows staff to bypass the normal booking loan period. To use it, the user must first check this box, then select the required dates using the Request From and To fields, and finally select Book It to book the item for the entered date range. |
| Message | Allows the user to enter a message about the resource being booked. Note: There is a Custom Setting called AllowAddMessageInIRMBooking, available when logged in as Admin All. Set this value to 1 to enable adding a message when booking a Resource Manager item in the ILS. The Message added while booking can then be viewed in the Circulation > Items To Checkout window. |
| Options... (button) | The "Options..." button in the booking/search window opens up a Search Options dialog where you can narrow your search results using several filters. Here's a quick summary of what can be adjusted: 1. Max Records Returned: Limit the number of search results (e.g., 2000). 2. Publication Date Range: Filter items by publication year (e.g., 2000 to 2010). 3. Language: Select items in a specific language (e.g., French). 4. Material Type: Choose types of materials (e.g., Book, DVD, etc.). 5. Audience: Target specific age groups (e.g., Adult, Adolescent, etc.). These filters help to quickly refine the search, especially in large databases. |
- Select the date that the request should be active using the Request From and To dates.
- Select Book It to place the bookings.
Note: To set a date beyond which Resource Manager bookings cannot be made, use the Custom Setting "Resource_Manager_Booking_End_Date" which can be accessed when logged in as Admin All. This setting allows for assigning a cutoff date for bookings, commonly used to restrict bookings past the end of the school year or term. When a date value is set in the format yyyy-MM-dd, the OPAC will prevent users from selecting any booking date beyond that value. This setting overrides any end dates configured under Schedules in Administration > Library Setting > Configuration II > Resource Manager tab.
Note: There is a Custom Setting in Admin All called “UseTermDueDateInIRMBooking” that must be set to 1 to enable the Term Due Date logic from Configuration > Circulation > Term Due Date in the Resource Center. The Term Due Date is used to specify the final date by which items must be returned. When a term due date is set, item due dates will not extend beyond this date, regardless of the standard loan period. If a loan period would naturally fall beyond the term due date, it will be automatically shortened to align with it. Enabling the "Use Term Due Date" checkbox activates this behavior, ensuring all due dates comply with the defined term limit.
Tip: To have the system automatically assign barcodes to Resource Manager bookings instead of leaving the barcode column blank, navigate to Administration > System Setting > Parameters > Collection Type. Double-click on the desired collection type to open the Edit Collection Type pop-up window. Check the checkbox labeled “Auto Assign Barcode” to enable this feature. Repeat this process for each collection type where automatic barcode assignment is needed.
¶ From the OPAC
To allow patrons to book an item from the Resource Manager site in the OPAC, the configuration setting "Allow Patron To Book" must be enabled. This setting can be found under Administration > Library Setting > Configuration > OPAC. Once enabled, patrons will see the "Book Item" button in the OPAC, allowing them to place bookings.
- Log in to the Resource Manager using your patron account and start a new search using the OPAC’s Search Bar.
- Locate the desired item and select the Book Item button to open the Booking window.
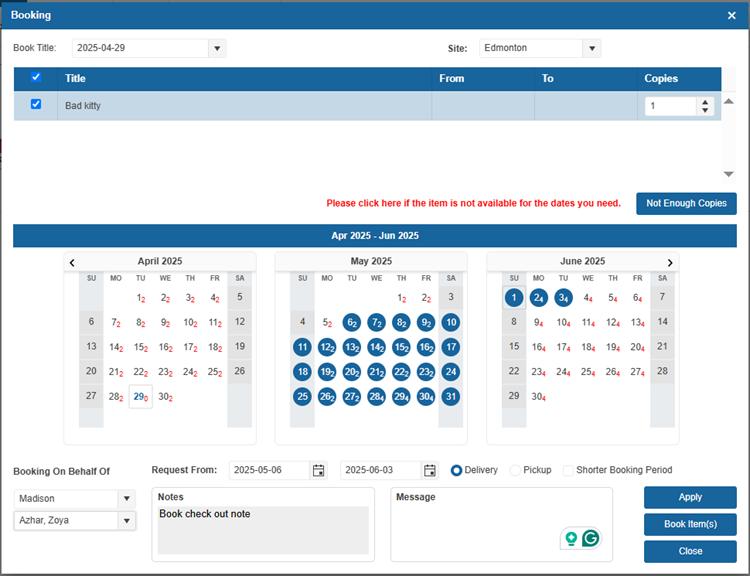
- Select the desired booking period by setting the Request From and To dates.
| Option | Description |
|---|---|
| Site (dropdown) | Allows the user to choose the site where they want to pick up the item. Note: Sites can be set up under Patron > Find/Add Site window. |
| Copies | Specify the number of copies to book (default is 1). |
| Not Enough Copies | It allows patrons to report if there are not enough available copies for the dates they selected. When clicked, the patron is prompted to confirm their requested dates. These reports are recorded and can be reviewed in the Booking Refusals or Turn Away Statistics report under Reports > Reports. |
| Booking On Behalf Of | This feature allows staff to create bookings on behalf of other patrons. Settings for allowing patrons to book on behalf of others can be configured under Administration > Library Setting > Configuration II > Resource Manager tab. |
| Delivery/Pickup (radio buttons) | Use this option to select how the booked item will be received. Delivery requests the item to be sent to a chosen site, while Pickup means the patron will pick up the item directly from the library. |
| Shorter Booking Period | When enabled, this option allows patrons to book items for a shorter loan period if a conflict prevents booking for the full standard loan period. |
| Notes | It displays any notes that have been set up for the item under Administration > Library Setting > Circulation Types > Item Circ Type tab. |
| Message | Allow the patron to add a message for the Resource Manager staff regarding their booked items. |
- Select the Book Item(s) button to complete and place the booking.
Note: To allow patrons to select a pickup library when booking items in the OPAC, the configuration setting "Select a pickup library when booking" must be enabled. This setting is located under Administration > Library Setting > Configuration II > OPAC tab. Once enabled, patrons will be able to choose or change a pickup library.
Note: The Custom Setting "ExcludeShortHolidaysForBookingPeriodEndDate" which can be accessed when logged in as Admin All, is used to control whether short holidays (1–3 days) are ignored when determining the end date of a booking period in Resource Manager OPAC. This setting helps extend booking periods by not counting brief holidays that fall within the requested period.
- Value = 1: Ignores holidays of 1 day.
- Value = 2: Ignores holidays of 2 days or less.
- Value = 3: Ignores holidays of 3 days or less.
This setting ensures that short holidays do not unnecessarily shorten or block booking durations in the OPAC.
Tip: Patrons who have booked items can view and manage their bookings by logging into the OPAC and navigating to My Account > My Borrowing > Booking. From there, they can select a date range and click Search to view all bookings made within that period. Patrons can also cancel a booking by hovering the cursor over the item’s cover image and clicking Cancel, or edit a booking by clicking Edit Booking.
Note: The RM OPAC Booking Limit field is available in the Catalog > Cataloging > Find/Add Item > Bib Info > Basic Info III tab. This field allows you to set a limit on how many copies of a title a single patron can book at one time. Once a number is entered and saved, the system will enforce this limit. If a patron exceeds the limit when booking through the OPAC, a warning will appear stating, "You may only book {#} copies of this item at one time." Similarly, if staff exceed the limit while booking on behalf of a patron in the Resource Manager, a warning message will display along with a prompt for an override password.
¶ Fulfilling a Booking
¶ View Bookings
When signed in to the Resource Manager site, the user can access the Items to Check Out feature, which allows the user to manage bookings. This feature has a number of capabilities. The user can review outstanding, finished, and cancelled bookings, prepare booked items for delivery, and print picking slips, transfer slips, and/or shipping labels.

- Navigate to Circulation > Items to Check Out.
| Option | Description |
|---|---|
| Booking [From – To] | Date range filter for viewing bookings. Only bookings falling between the selected dates will be shown in the results. Note: The system allows customization of how many days in advance bookings are displayed under Resource Manager > Circulation > Items to Check Out through the Custom Setting ItemsToCheckOutDefaultSearchDateBuffer which can be accessed when logged in as Admin All. By default, it is set to 0, which means no buffer days are applied. To automatically display bookings starting from a certain number of days ahead (e.g., 2 days), this setting can be changed to ‘2’. |
| Additional Refinement Filters | If necessary, specify additional refinement options including Site, Patron, Route, and Collection Type. 1. Center: Filters bookings made by the selected Resource Center. This is used in districts with multiple Resource Centers to view and manage bookings created by a specific center. 2. Site: Filters bookings by site. Sites can be added under Patron > Find/Add Sites window. 3. Collection Type: Filters bookings by collection type. 4. Patron: Filters bookings made by a specific patron. 5. Material Type: Filters bookings based on the type of material. 6. Route: Filters bookings based on the delivery route. 7. Location: Filters bookings based on specific copy location in the Resource Center. |
| View Specific Bookings | Specify the bookings you would like to view. 1. Show Outstanding Bookings: Displays only upcoming bookings that have not yet been prepared or sent for delivery. 2. Show Finished Bookings: Displays only bookings that have already been prepared and sent. 3. Show Cancelled: Displays bookings that were cancelled. 4. Show All: Displays finished, cancelled and outstanding bookings. |
| Include Past (checkbox) | The Include Past checkbox can be selected to include any bookings made in the past that were not fulfilled on top of relevant bookings for the date range specified. An unfulfilled booking is often due to the item(s) being overdue from the previous patron. Note: There is a Custom Setting named “ShowIncludePastInItemToCheckout” which can be accessed when logged in as Admin All should be set to 1 to enable this checkbox in the Items To Checkout window. |
| Preview (button) | The Preview button generates a printable list of the bookings displayed in the grid. Users can choose to print the list in PDF, Excel, or Text format. |
| RFID (button) | When the RFID button is selected, a window will pop up, and the IP address of the RFID device must be entered. Ensure 'Remember IP' is checked to retain this IP address for future uses of the RFID feature. Items are then placed on the RFID pad, and the 'Read Barcodes' button is selected to retrieve the barcodes from the RFID tags. The barcodes of the items will be listed in the popup window, and then selecting 'OK' applies the barcodes to the patron as checked-out items. |
2. Select the List button to show the bookings in the grid.
¶ Prepare Bookings for Delivery
To prepare bookings for delivery, check out the selected items to mark them as ready for delivery.
- Navigate to Circulation > Items to Check Out.
- Select the items you would like to go out in the upcoming delivery and select Checkout.
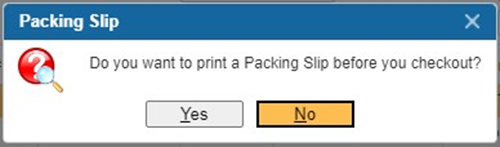
- The system will prompt you to either print a packing slip or not.
3.1. If a packing slip is desired, select Yes.
3.2. If a packing slip isn’t desired, select No. - After this selection, a second pop-up will appear and inform you how many items were checked out.
¶ Break Up Finished bookings
This option splits a booking into two separate bookings based on copy availability. The original booking is marked as finished with the number of available copies, while a new booking is created for the remaining unfulfilled copies. It is used when there are not enough copies to fulfill the full booking, allowing available items to be sent immediately while the rest are delivered later. This button must first be enabled from the More... menu.
- Navigate to Circulation > Items To Check Out.
- Search for the desired booking.
- Select the desired booking’s checkbox.
- Click Break Up Finished Booking.
- Booking should now be split into two.
¶ Cancel or Change Bookings
To change or cancel bookings, use options such as Unbooking, Change, Change Copy, Bump Up, Change Delivery Site, or Delay Notify to update, reschedule, or communicate changes to bookings as needed.
- To cancel a booking, under the Circulation > Items to Check Out window, select the desired booking and click the UnBooking button. You will be prompted to select a reason for cancelling the booking.
Note: When a booking is cancelled using the UnBooking button, a list of unbooking reasons is displayed. To customize this list, use the “Unbooking Reason” parameter found under Administration > System Setting > Parameters.
Tip: Any additional reasons added here will appear in the cancellation prompt and be reflected in the Cancellation Reports.
- To change a booking, select the booking and then click the Change button. The Booking Detail window will display. Select Edit to make your changes, such as required dates, number of needed copies, or delivery method, and then click Save.
- To change the copy that will be used to fulfill the booking, select the booking and then click the Change Copy button. Select the copy to be used from the Available Copy List window and click OK.
- To move booking requests forward (e.g., due to a delay), select the booking and then click the Bump Up button. The Bump Up window will display, which allows you to use the checkboxes to select requests and have them bumped up by a specified number of weeks. Select Bump Up to make the change.
- To change the delivery site for the selected booking in the Items to Checkout window, click the Change Delivery Site button.
Note: You can only change the delivery site if the original site and the new site share the same delivery Route.
- Insignia can automatically send a delay notification to a patron expecting a resource, or you can manually send one by selecting the delayed item in the grid, clicking Delay Notify, and confirming the pop-up message.
Note: To automatically send a delay notification, ensure the Custom Setting SendIRMBookingDelayMessage is set to 1 (this setting is accessible when logged in as Admin). The delay notification message can be set in Administration > Library Setting > System Message.
¶ Printing Labels and Slips
In the Resource Manager site under Circulation > Items To Check Out window, the system allows users to print Packing Slips, Transfer Slips, Shipping Labels, and Picking Slips to manage and track the delivery, transfer, and checkout of booked items.
- To print the packing slip to see the list of items to pack, click Packing Slip. This includes the delivery route, delivery location, requested date, due date, patron requesting the item, and copy summary information.
Note: The content and format of the Packing Slip can be customized using the following Custom Settings, which can be accessed when logged in as Admin All:
- The HideBarcodeinPackingSlip setting, when set to 1, hides the scannable barcode from the Packing Slip.
- The DefaultOrderinPackingSlip setting controls the item order in the Packing Slip; set to 1 to sort the items by Catalogue# or 0 to sort by Title.
- The HideBarcodeInRMInSelectedReports setting, when set to 1, hides barcodes in the Items to Check Out, Pick Up Slip, and Packing Slip reports of the Resource Manager.
- The HideDeliveryDateInRMInSelectedReports setting, when enabled, hides the Delivery Date in the Items to Check Out and Packing Slip reports of the Resource Manager.
- The PrintAllItemsForPackingSlip setting controls which items appear on the Packing Slip. When set to 0, only Delivery items are included. When set to 1, all items are included, including both Delivery and Pickup items.
- The PrintBookingWithoutBarcodeInPackingSlip setting, when set to 0, excludes bookings without barcodes from the Packing Slip report.
- To print a slip for items to be picked up from one site and and delivered to fulfill an upcoming booking in the Resource Manager, click Transfer Slip. This feature is used when an item has already been checked out to a patron at one school site and must be transferred to another site before returning to the Resource Center.
Note: The Custom Setting OnlyAssignAvailableCopyInItemToCheckout, which can be accessed when logged in as Admin All, controls whether copies with a status other than "In" can be assigned to bookings. When this setting is set to 1, the system will only assign available (In) copies to bookings, and as a result, Transfer Slips will not be generated. To enable the use of Transfer Slips, this setting must be set to 0.
- To print shipping labels to attach to the outgoing resources, click on Shipping Labels. The user can print labels for the items to be sent out with information including patron, delivery site, item title, booking start date, due date, barcode number, and call number.
Note: The NewShippingLabelLayout Custom Setting controls the display layout of the Shipping Labels. The default value is 0, which uses the original layout.
- Set to 1 to hide the address and Route #, and move Catalogue # and Copy # into a row.
- Set to 2 to hide the address and display Route #, Delivery Order, Location, and Catalogue # in a row.
- Set to 3 to show the District and Library, grouping copy info together and delivery info together.
- Set to 4 to display Barcode, Copy #, and Part together, Delivery Date and Due Date together, and show the site name at the top.
Tips:
- To print multiple shipping labels for a copy that contains multiple kit pieces using the Avery 8463 Multiple Copies layout, set the custom setting PrintMultiplePiecesForAvery8463ShippingLabelLayout to 1.
- Use the ShippingLabel4X2Type Custom Setting to control the label size and whether to include a return checkbox. Set to 0 for 4" x 2.05" labels without the “Check here when returning” message. Set to 1 for 4" x 2" labels that include the return checkbox message.
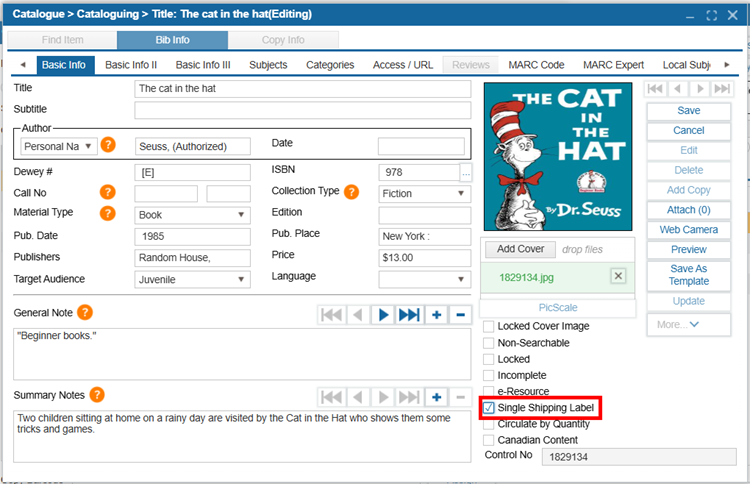
- The "Single Shipping Label" checkbox is located in the Find/Add Item window under Catalog > Cataloging > Find/Add Item > Bib Info > Basic Info tab, If the library is using the 4"x2" (Item) Shipping Label Layout, selecting the "Single Shipping Label" checkbox will ensure only one label is printed for a title, even if multiple copies are booked for the same patron.
To display the copy barcode and kit piece details in the Avery 8463 for Multiple Copies shipping label layout, set the ShowCopyInfoInAvery8463ShippingLabelLayout Custom Setting to 1. Set to 0 to use the previous layout logic.
- To print a list of the items that have been checked out and are ready to be picked up for delivery, click Picking Slip. You will be prompted to specify the date/time range for the list and then click OK to generate the slip.
Note: The Custom Setting PrintCheckedOutItemsInPickingSlip controls which booked items appear on the Picking Slip:
- Set to 1 to include only checked-out booked items.
- Set to 0 to include only booked items that have not been checked out.
- Set to 2 to include all booked items, regardless of checkout status.
¶ Items Not Found
The Items Not Found window is used along with the Picking Slip to assign a different copy of the same item or to rebook an item that could not be located at the Resource Center.
- Print the Picking Slip from Circulation > Items to Check Out or Report > Resource Manager.
- After being unable to locate that specific copy, pick a similar copy to fulfill the booking.
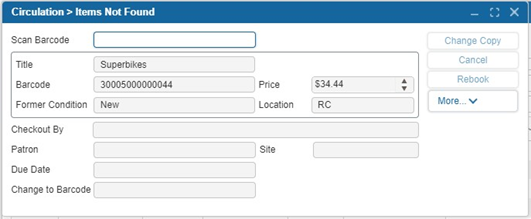
- Navigate to Circulation > Items Not Found. Scan the barcode of the copy that you were unable to locate from the Picking Slip into the Items Not Found window’s Scan Barcode box.
- Scan the replacement resource’s barcode into the Change to Barcode box. Select Change Copy.
- Select Rebook to book the item for a different date.
6. If you are unable to find a replacement copy to fulfill the booking, select the Cancel button to cancel the booking.
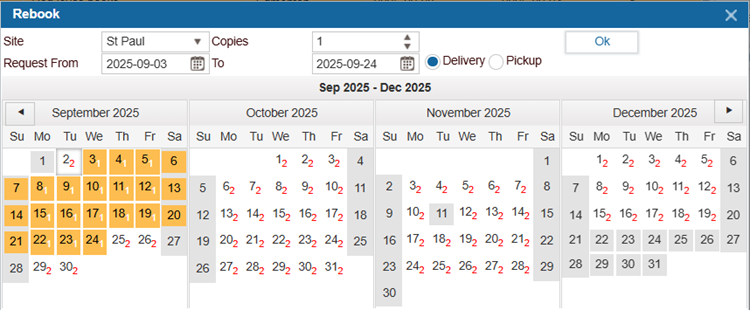
¶ Rebook
This feature is used when a patron’s site has changed since they originally booked items. The system helps update the booking so it matches the patron’s new site.
- Navigate to Circulation > Alerts > Rebook tab. This tab displays a list of patrons who have booked items from a site that no longer matches their current site in their patron record.
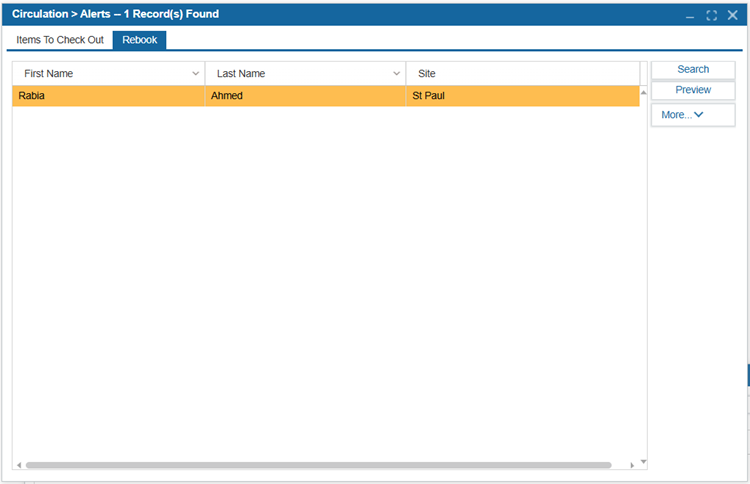
- Double-click on the patron’s name. This opens a Rebook pop-up window, showing all the bookings that need to be reviewed or updated for the selected patron.
2.1. Rebook: Updates the booking to reflect the patron’s current site.
2.2. UnBooking: Cancels the selected booking(s).
2.3. Change To Pickup: Converts the booking to a pickup instead of delivery.
2.4. Refresh: Reloads the pop-up window to reflect the most recent data.
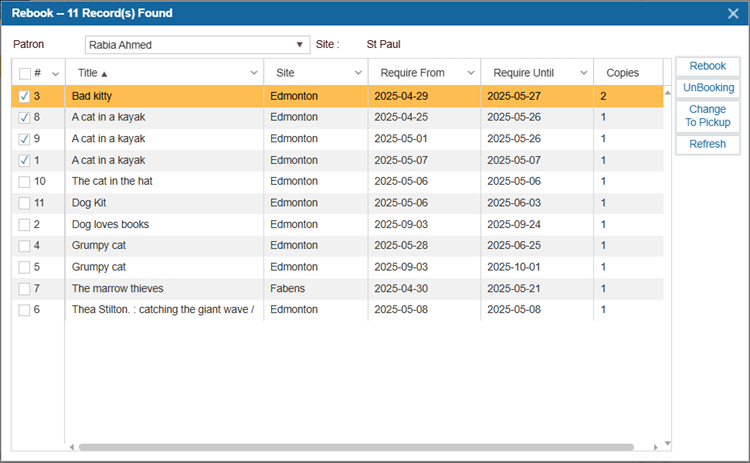
- Use the checkboxes on the left to choose the items you want to rebook, then click Rebook. A new Rebook pop-up window will open, where you can select new booking dates using the Request From and Request To fields, choose the Site, enter the number of copies in the Copies field, and select the checkout mode, either Delivery or Pickup. Once everything is set, click OK to rebook the item.
Note: For the Rebook tab to appear under the Circulation > Alerts window, the Security Setting "Rebook" must be enabled. This can be done by navigating to Administration > Security > Circulation > Alerts and enabling the setting for the Patron Group responsible for handling rebookings.
¶ Items To Check In
The Items To Check In window provides library staff with a convenient way to view, filter, and process the return of multiple items that are due within a selected date range.
- Navigate to Circulation > Items To Check In.
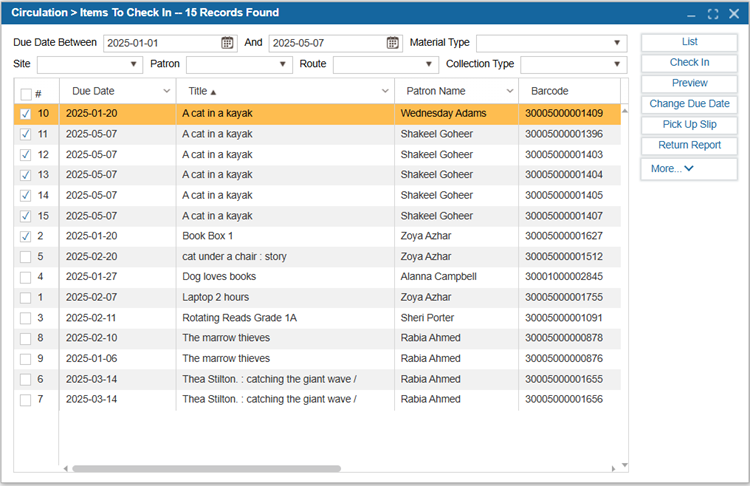
- Enter the desired date range in the Due Date Between fields.
- Optionally, apply additional filters such as Site, Patron, Material Type, or Collection Type to narrow down the results.
- Select the List button to display items that match the selected criteria.
- Use the checkboxes next to each item to select one or more items for check-in.
| Option | Description |
|---|---|
| Preview | The Preview button generates a printable list of the bookings displayed in the grid. Users can choose to print the list in PDF, Excel, or Text format. |
| Change Due Date | The Change Due Date button allows Resource Manager staff to update the return date of selected checked-out items directly from the Items To Check In window by modifying the Required Until field in the pop-up. |
| Pick Up Slip | The Pick Up Slip button generates a printable pickup slip to assist with processing items listed in the Items To Check In window. |
| Return Report | The Return Report button generates a printable, detailed report of the returned items listed in the Items To Check In window. |
- Select the Check In button to process the selected item(s) for return.
¶ Standard Checkout
The Check Out window provides access to several circulation functions in the Resource Manager.
- Open Circulation > Check Out and search for the patron in the Patron Name/Barcode box to load up their profile.
- Scan the barcodes of the items you would like to check out.
- Use the Set Due Date To checkbox if you would like to select a custom due date.
Note: For complete functionality of the Standard Checkout window (accessible via Circulation > Check Out), please refer to the Check Out section in the Circulation module.
Tip: For customers that use both Resource Manager and Library Manager, it's common to limit patron search results to staff only, especially when searching in Patron > FindAddPatron or during the booking process in Circulation > Check Out > Booking. To hide students from these search results, update the Custom Setting DoNotSearchStudentInIMMCheckout and DoNotSearchStudentInIMMFindAddPatron to a value of 1 under Administration > System Setting > Custom Setting while logged in as Admin All. This helps streamline the search experience for staff-focused Resource Manager workflows.
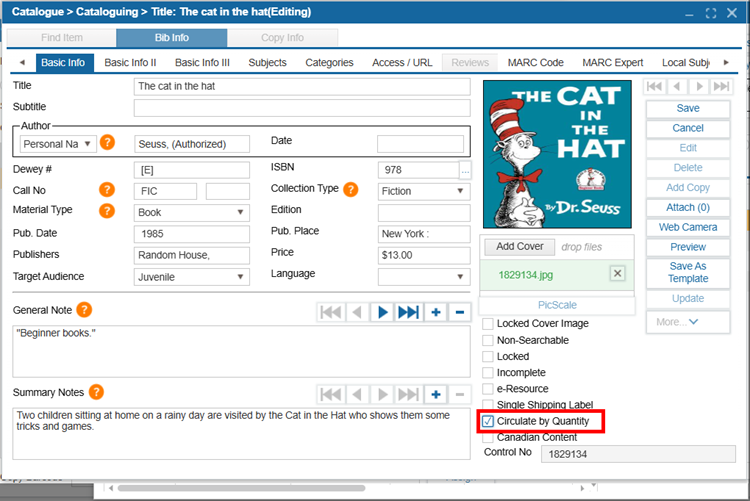
¶ Circulate By Quantity
This section explains how to check out multiple copies of an item at once in the Checkout window. By using the "Circulate By Quantity" checkbox and specifying the desired number of copies, users can quickly process bulk checkouts for a single item.
- In the Find/Add Item window, navigate to the Bib Info > Basic Info tab and select the "Circulate By Quantity" checkbox.
- Navigate to Circulation > Checkout and search for the patron.
- Select the Magnifying Glass Icon and search for the item you wish to check out.
- Enter the number of copies you want to check out in the Copies field.
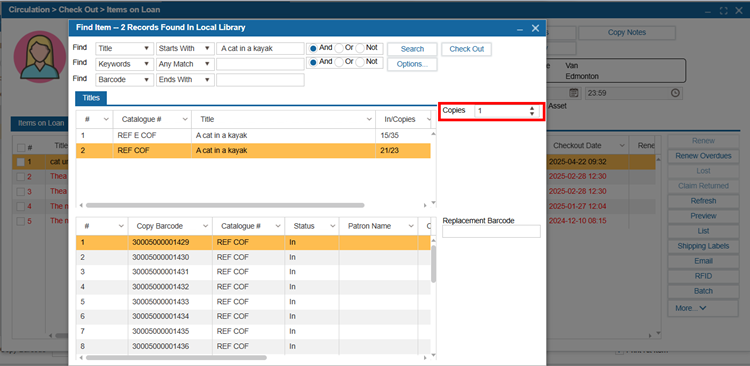
- Select the Checkout button.
¶ Standard Check In
The Check In window allows users to check in items, set custom check-in dates, and manage damaged items in Resource Manager.
- Open Circulation > Check In and scan the barcode of the item you are checking in.
- Select the Force Checkin Date To checkbox if you would like to select a check-in date that differs from today’s date.
- Select the Check In Damaged Items checkbox if you would like to scan in damaged items and have their copy status changed to Damaged and/or assess a replacement charge for the damage.
Note: For complete functionality of the Standard Check In window (accessible via Circulation > CheckIn), please refer to the CheckIn section in the Circulation module.
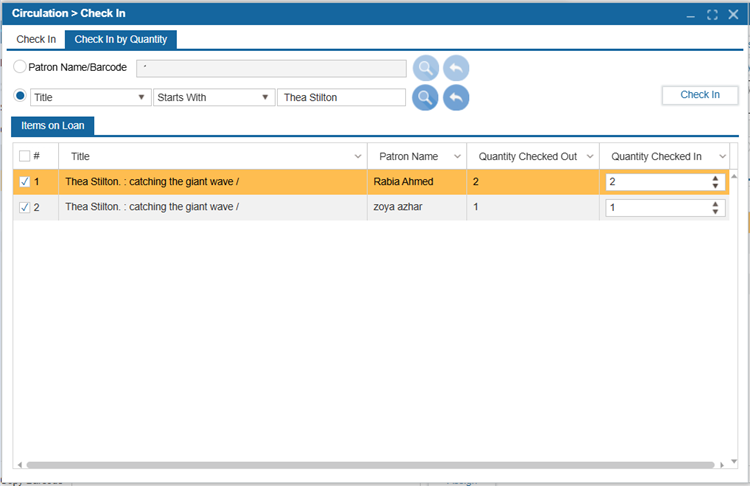
¶ Check In By Quantity
The Check In By Quantity tab allows staff to check in multiple copies of an item borrowed by a patron without having to scan each barcode individually. This simplifies and speeds up the process for bulk returns.
- Navigate to Circulation > Check In > Check In by Quantity tab. This switches the process from scanning individual barcodes to a quantity-based check-in method.
- Choose a search method using the radio buttons. Select either the "Patron Name/Barcode" or "Title" radio button:
2.1. If Patron Name/Barcode is selected, enter the patron’s name or barcode to retrieve their checked-out items.
2.2. If Title is selected, the system will retrieve all checked-out copies of that specific title. - The system will display the relevant checked-out items in the Items on Loan tab based on the selected search method.
- Select the checkbox next to the item to be returned and enter the number of copies being returned in the Quantity Checked In field.
- Click the Check In button to complete the check-in process for the selected quantity.